
Integration with CipherTrust Manager
This section lists the steps to integrate VMware with CipherTrust Manager.
Prerequisites
This section provides the prerequisites for integration of VMware with CipherTrust Manager.
Ensure that the CipherTrust Manager is installed and configured. For more details, refer to the CipherTrust Manager Documentation.
VMware communicates with the CipherTrust Manager using the KMIP interface. Ensure that the KMIP interface is configured on the CipherTrust Manager.
IP address of the CipherTrust Manager and port of the KMIP interface must be accessible from the VMware system.
CipherTrust Manager recognizes only registered KMIP clients. Ensure that each node of the VMware cluster is registered as a KMIP client on the CipherTrust Manager. Refer to KMIP Client Registration for more details.
Configuration on CipherTrust Manager
To configure the CipherTrust Manager, you need to perform the following steps:
Creating a Domain (Optional)
Perform the following steps to be performed on CipherTrust Manager:
Navigate to Admin Settings > Domains.
Click Add Domain. The Add Domain page appears.
Specify the following information:
Name - Enter the domain name.
Admins - Select the admins (one or more) from the list available in the drop down. For example, admin.
Parent CA - Select parent CA as root CA.
Allow Subdomain User Management - Select this check box if you want to enable the sub-domain user management through this domain.
Click Save.
Switch to the newly created domain by clicking the top right on the current Domain Name.
Creating a User
To create a user, perform the following steps:
Log on to the CipherTrust Manager GUI.
Open the Access Management application.
On the left navigation pane, click Users. The Users page is displayed.
On the Users page, click Add User.
On the Add User page, provide the following details:
Select the required Connection Type
Select the checkbox against the required Allowed Client Type.
Enter Full Name
Enter Username
Enter the desired Password. Re-enter the password in the Password Match field.
Click Add User. The newly created user will now appear on the Users page.
Note
To create a user in sub-domain, you must enable Allow Subdomain User management.
To create a user, perform the following steps:
Log on to the CipherTrust Manager GUI with the User you created within the sub-domain.
Open the Access Management application.
On the left pane, click Users. The Users page is displayed.
On the Users page, click Add User.
On the Add User page, provide the following details:
Select the required Connection Type
Select the checkbox against the required Allowed Client Type.
Enter Full Name
Enter Username
Enter Password. Re-enter the password in the Password Match field.
Click Add User. The newly created user will now appear on the Users page.
Assigning User to a Group
Perform the following steps to add user to a group:
Navigate to the Users page.
Click the ellipsis button (...) corresponding to the user that you created in the previous step.
Click Edit/View.
Click Group Memberships > Add Group.
In the search bar, enter the desired Group name and select the check box corresponding to it. For example, Key Admins or Key Users.
Click Add Group.
Creating or Adding a CA (Optional)
Note
Creating a CA is an optional step in this integration. However, it is recommended to select the CA carefully, as it will be used throughout the process.
Select the Local CA tab if you want to create a Local CA OR select the External CA tab if you wish to add the External CA.
To create/add a Self-signed local CA, perform the following steps:
Navigate to CA > Local. Select Add Local CA, the Add Local CA page appears.
Provide the required information and click Add Local CA. The created Local CA will appear under Pending CAs section.
Click the ellipsis against the Local CA that you created and select the option Self-sign.
Select a valid duration for the Local CA. Click Save.
To add an external CA, perform the following steps:
Navigate to CA > External. The External Certificate Authorities page appears. Select Add External CA, the Add External Certificate page appears.
Provide the required information.
If you want to upload the external CA, select the File Upload option and click Upload Certificate. Browse and select the required External CA.
OR
Select Text and paste the contents of External Certificate.
Click Add External CA.
Registering a KMIP Client
You can register a KMIP client on the CipherTrust Manager through:
Auto Registration
Manual Registration
Log on to the CipherTrust Manager.
Go to Products > KMIP.
Create Client Profile using the following steps:
Navigate to Client Profile and click Add Profile.
Add a Profile Name.
Click Save. The new profile is created.
Create Registration Token using the following steps:
Go to Registration Token and click New Registration Token > Begin.
Add a Name Prefix.
Specify a Token Lifetime value along with the Client Capacity for the token.
Click Select CA.
Select the CA type as Local/External depending on CA that you created above.
Select the appropriate CA from the dropdown menu and click Select Profile.
Select the Client Profile from the dropdown which you have created in the above step.
Click Create Token.
Copy the value of the Token created and click Done.
Note
If you are using External CA then you can select the external CA that you created above and uploaded on the CipherTrust Manager.
Turn ON Auto Registration using the following steps:
Go to Admin Settings > Interfaces.
Click the ellipsis button (...) corresponding to the kmip interface.
Click View/Edit.
On the Interface Detail window, perform the following:
Select the Interface Mode as TLS, verify client cert, user name taken from client cert, auth request is optional.
Select Auto Registration checkbox.
Paste the
Registration Token.Add the CA (Local or External) to the list of Trusted CAs. The CA will reflect uder the dropdown menu of Local/External Trusted CAs depending upon CA that you created above.
Click Update.
Log on to the CipherTrust Manager.
Go to Products > KMIP.
Create Client Profile using the following steps:
Go to Client Profile and click Add Profile.
Add a Profile Name.
Select CN in Username Location in Certificate.
Click Certificate Details.
You can either paste the content of a generated
client.csror you can create one, by filling in the required details.Click Save.
Create Registration Token using the following steps:
Go to Registration Token and click New Registration Token > Begin.
Add a Name Prefix.
Specify a Token Lifetime value along with the Client Capacity for the token.
Click Select CA.
Select the CA type as Local/External depending on the CA type that you created above.
Select the appropriate CA from the dropdown menu and click Select Profile.
Select the Client Profile from the dropdown which you have created in the above step.
Click Create Token.
Copy the value of the Token created and click Done.
Note
If you are using External CA then you can select the external CA that you created above and uploaded on the CipherTrust Manager.
Go to Registered Clients and click Add Client.
Specify client name and paste the Registration Token that you generated in the above step.
Note
If you are using external CA then you can either upload the client certificate as a file using Upload Certificate or paste the signed client certificate in the Client Certificate field.
Click Save to save the client certificate.
You can register a KMIP client on the CipherTrust Manager through:
Auto Registration
Manual Registration
Log on to the CipherTrust Manager into your domain.
Go to Products > KMIP.
Create Client Profile using the following steps:
Navigate to Client Profile and click Add Profile.
Add a Profile Name.
Click Save. The new profile is created.
Create Registration Token using the following steps:
Go to Registration Token and click New Registration Token > Begin.
Add a Name Prefix.
Specify a Token Lifetime value along with the Client Capacity for the token.
Click Select CA.
Select the CA type as Local/External depending on CA that you created above.
Select the appropriate CA from the dropdown menu and click Select Profile.
Select the Client Profile from the dropdown which you have created in the above step.
Click Create Token.
Copy the value of the Token created and click Done.
Note
If you are using External CA then you can select the external CA that you created above and uploaded on the CipherTrust Manager.
Turn ON Auto Registration using the following steps:
Go to Admin Settings > Interfaces.
Click the ellipsis button (...) corresponding to the kmip interface.
Click Edit.
On the Interface Detail window, perform the following:
Select the Interface Mode as TLS, verify client cert, user name taken from client cert, auth request is optional.
Select Auto Registration checkbox.
Paste the
Registration Token.Add the CA (Local or External) to the list of Trusted CAs. The CA will reflect uder the dropdown menu of Local/External Trusted CAs depending upon CA that you created above.
Click Update.
Log on to the CipherTrust Manager into your domain.
Go to Products > KMIP.
Create Client Profile using the following steps:
Go to Client Profile and click Add Profile.
Add a Profile Name.
Select CN in Username Location in Certificate.
Expand the Certificate Details section.
You can either paste the content of a generated
client.csror you can create one, by filling in the required details.For domain, the format to enter the Common Name field of the cert is always:
domainName||domainUserClick Save.
Create a Registration Token using the following steps:
Go to Registration Token and click New Registration Token > Begin.
Add a Name Prefix.
Specify a Token Lifetime value along with the Client Capacity for the token.
Click Select CA.
Select the CA type as Local/External depending on CA that you created above.
Select the appropriate CA from the dropdown menu and click Select Profile.
Select the Client Profile from the dropdown which you have created in the above step.
Click Create Token.
Copy the value of the Token created and click Done.
If you are using External CA then you can select the external CA which you created earlier. Refer to External CA under Creating or Adding a CA.
Go to Registered Clients and click Add Client.
- Specify client name and paste the Registration Token generated in the above step.
Note
If you are using external CA then you need to paste the signed client certificate in the Client Certificate field.
- Click Save to save the client certificate.
Configuring the KMIP Interface
The KMIP interface can be configured through:
Go to Admin Settings > Interfaces.
On the KMIP Interface, click the ellipsis button (...) and then click View/Edit.
Select the Auto Registration checkbox if you auto-registered your KMIP client and paste the value of the registration token that you created.
Note
By default, the Auto Registration is disabled.
Select the mode as TLS, verify client cert, user name taken from client cert, auth request is optional.
Specify selections for Local CA for Automatic Server Certificate Generation as desired.
Note
In case of External CA, Local CA for Automatic Server Certificate Generation should be set to Turn off auto generation from Local CA.
Depending upon the CA that you created above, select an option from the following::
If you are using Local CA then select the CA under Local Trusted CAs
If you are using External CA then select the CA under External Trusted CAs, provided you have the external CA that you created and uploaded on the CipherTrust Manager. For more information on creating or uploading CA, refer to Creating or Adding a CA.
Select the CA according to your preference.
Login to your sub-domain. Go to CA > Local. Click the ellipsis (...) and copy the contents of your CA Certificate.
Logout of your sub-domain and now login to the root domain.
Go to CA > External > Add External CA.
Enter a name for this Domain CA and select the text radio button and paste the certificate contents.
Click Add External CA.
Go to Admin Settings > Interfaces.
Click the Add icon to add the External CA.
Click Update.
Note
If you are using an External CA in the Sub-Domain, you need to add the CA as an External CA in both the root domain as well as the sub-domain and modify the interface accordingly.
Login to your sub-domain. Go to CA > Local. Click the ellipsis (...) and copy the contents of your CA Certificate.
Logout of your sub-domain and now login to the root domain.
Go to CA > External > Add External CA.
Enter a name for this Domain CA and select the text radio button and paste the certificate contents.
Click Add External CA.
Go to Admin Settings > Interfaces.
Click the Add icon to add the External CA.
Click Update.
On the KMIP interface, click the ellipsis (...) > Certificate Options > Upload New Certificate > Ok.
Select the Certificate Chain option and click Build Certificate Chain.
Click on Text and paste the contents of Server Certificate, CA, and Server Key file in the same order. Do not introduce any space, character or symbol between the contents of these files.
Select certificate Format as PEM.
Click on Upload Certificate.
On the KMIP Interface, click the ellipsis button (...) and then click View/Edit.
Select the Auto Registration checkbox if you auto-registered your KMIP client and paste the value of the registration token that you created.
Note
By default, the Auto Registration is disabled.
Select the mode as TLS, verify client cert, user name taken from client cert, auth request is optional.
Specify selections for Local CA for Automatic Server Certificate Generation as desired.
Note
In case of External CA, Local CA for Automatic Server Certificate Generation should be set to Turn off auto generation from Local CA.
Further, You need to perform the following configuration on CipherTrust Manager specific to VMware:
Creating a Client Certificate
This section is applicable to KMIP clients registered using Auto Registration.
Log on to the CipherTrust Manager.
Navigate to the CA > Local CA and click on the name of the CA certificate you need to issue the certificate from.
Click on Issue Certificate.
Enter the Display Name, followed by Common Name.
The common Name of the certificate should be the same as the name of the user you created on CipherTrust Manager. Refer to Creating a User section.
For more information on the format of common name of the certificate, refer to LDAP and Multi-Domain Client Usernames in KMIP Certificates.Select the Algorithm and Size, and click Issue Certificate.
Save the Private Key and the CSR.
Select the Certificate Purpose as client, specify the validity of the certificate in days, and click Issue Certificate.
Download a copy of this certificate by clicking the ellipsis next to the certificate name.
Configuring NTP Server (Optional)
Based on your deployment strategy, you may need to configure an NTP (Network Time Protocol) server. Use either of the following commands to add an NTP server:
Command 1:
ksctl ntp servers add --host time.nist.gov
Command 2:
ksctl ntp servers add --host ntp-b.nist.gov --key secret
Configuration on VMware
Add KMS to the vCenter Server
To add KMS, perform the following steps on the vCenter UI.
Log in to the vCenter Server.
Browse the inventory list and select the vCenter Server instance.
Click Configure and under Security, click Key Providers.
Click Add Standard Key Provider, enter key provider information, and click Add Key Provider. You can click Add KMS to add more Key Management Servers.
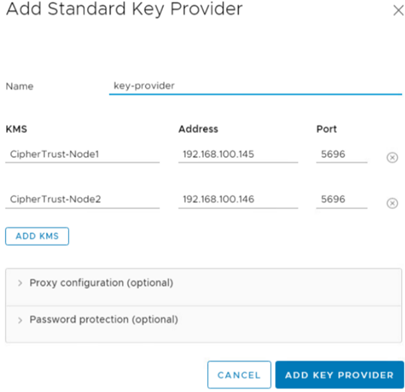
Click Trust. vCenter Server adds the key provider and displays the status as Connected.
Uploading Client Certificate and Private Key onto vSphere
Perform the following steps to upload Client Certificate and Private Key:
Log in to the vSphere Web Client, and select a vCenter Server system.
Click Configure and select Key Management Servers.
Select the KMS instance with which you want to establish a trusted connection.
Select Upload a File and upload copies of the client certificate and private key and click Establish Trust.
Alternatively, you can paste the certificate that you received from the KMS vendor into the top text box or click Upload File to upload the certificate file. Paste the key file into the bottom text box or click Upload File to upload the key file.
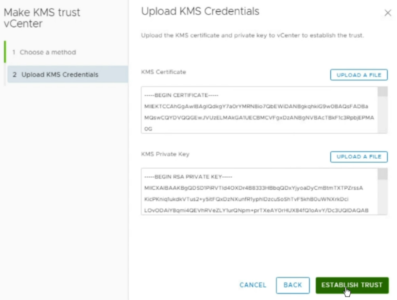
Click OK.
You can enable the following encryptions:
First Class Disk (FCD), or Improved Virtual Disk, enables independent lifecycle management of virtual disks separate from VMs. FCDs can be created through FCD APIs or by promoting existing disks.
FCDs are managed via the VSLM API. Newer vSphere versions allow snapshot-based backups of detached FCDs using UUID and datastore ID, unlike earlier versions that required attachment to a dummy VM. Regular I/O still needs attachment. FCDs support encryption via external KMS for enhanced security.
Here are the steps to Configure FCDs:
Steps to Create a New VM Storage Policy with Encryption
Go to Menu > Policies and Profiles > VM Storage Policies.
Click Create to create a new storage policy.
Enter a name for the policy (for example,
FCD-Encryption-Policy).Under Rule Sets, select Enable encryption.
Complete the wizard and click Finish.
Steps to Create an Encrypted First-Class Disk (FCD)
Connect to the vCenter Server using PowerCLI.
Connect-VIServer -Server 10.xx.xx.xx -User appuser -Password xxxxxxxFetch the storage policy and the corresponding datastore.
$storagePolicy = Get-SpbmStoragePolicy -Name "TCG-Policy-Thales"
$datastore = Get-Datastore -Name "datastore1"
Create a new encrypted disk and attach it to your VM.
New-HardDisk -CapacityGB 10 -StoragePolicy $storagePolicy -Datastore $datastore -Confirm:$false -VM Windows-Test_Machine -KeyProvider $keyprovider
Connect to vCenter Server by using the vSphere Client.
Right-click the virtual machine that you want to encrypt and select VM Policies > Edit VM Storage Policies.
Select the storage policy.
To encrypt the VM and its hard disks, select an encryption storage policy and click OK.
To encrypt the VM but not the virtual disks, toggle on Configure per disk, select the encryption storage policy for VM Home and other storage policies for the virtual disks, and click OK.
If you prefer, you can encrypt the virtual machine, or both virtual machine and disks, from the Edit Settings menu in the vSphere Client.
Right-click the virtual machine and select Edit Settings.
Select the VM Options tab, and open Encryption. Choose an encryption policy. If you deselect all disks, only the VM home is encrypted.
Click OK.
To enable vSAN encryption:
Navigate to the KMS cluster created in vCenter.
Right-click the cluster and select Settings. The Configure tab is displayed.
Expand the vSAN section and click General.
Click Edit. Edit vSan Settings window is displayed.
Enable Encryption and select the previously created KMS cluster.
Click OK.
VMWare has added a new feature named vSphere Trust Authority and CipherTrust Manager supports this feature. To configure vSphere Trust Authority, refer to the VMWare documentation.
To connect Key Provider Service to KMS, you need to configure the trust setup.
Example:
Set-TrustAuthorityKeyProviderClientCertificate -KeyProvider $kp8 -CertificateFilePath <path/to/certfile.pem> -PrivateKeyFilePath <path/to/privatekey.pem>
Configure and Enable Trust Authority State
vSphere Trust Authority is not enabled by default. You must configure your environment for vSphere Trust Authority before you can start using it.
Making a vCenter Server cluster into a vSphere Trust Authority Cluster (also called enabling the Trust Authority State) starts the required Trust Authority services on the ESXi hosts in the cluster.
Connect as the Trust Authority Administrator user to the vCenter Server of the Trust Authority Cluster.
Connect-VIServer -server vsphere-sunnyvale1.gemalto.com -User trustedadmin@vsphere.local -Password xxxxxxxxIf you see the following error.
Connect-VIServer : 2/14/2022 1:50:42 PM Connect-VIServer Error: Invalid server certificate. Use
Set-PowerCLIConfiguration to set the value for the InvalidCertificateAction option to Prompt if you'd like to connect once or to add a permanent exception for this server.
Additional Information: Could not establish trust relationship for the SSL/TLS secure channel with authority 'xx.xxx.xxx.11'.
Run the following command and try again.
Set-PowerCLIConfiguration -InvalidCertificateAction IgnoreCheck the current state of the cluster. The output shows either
DisabledorEnabledin theStatecolumn for each cluster found.Disabledmeans that the Trust Authority services are not running.Enable the Trust Authority Cluster.
Set-TrustAuthorityCluster -TrustAuthorityCluster 'Infrastructure' -State Enabled
Two services start on the ESXi hosts in the Trust Authority Cluster.
The Attestation Service
The Key Provider Service
Collect Information about ESXi Hosts and vCenter Server to be Trusted
To establish trust, the vSphere Trust Authority Cluster requires information about the Trusted Cluster's ESXi hosts and vCenter Server. This information should be exported as files for importing into the Trust Authority Cluster.
Export the ESXi Host Description of Software
Disconnect from all connections.
Disconnect-VIServer -server * -Confirm:$falseConnect as the root user to one of the ESXi hosts in the Trusted Cluster.
Connect-VIServer -server 10.xxx.xx.xx -User root -Password xxxxxxxxx
Connect-VIServer -server 10.xxx.xx.xx -User root -Password xxxxxxxxx
Confirm the ESXi host:
Get-VMHostAssign Get-VMHost to a variable.
$vmhost = Get-VMHostExport the ESXi host description of software (the ESXi image). By default, this command exports the information to the
image.tgzfile. Theimage.tgzfile in the example is namedimage-esxi-201.tgzto indicate what ESXi host this is from. Ensure that the destination directory exists before running this command:Export-VMHostImageDb -VMHost $vmhost -FilePath C:\vta\image-esxi-201.tgz
Collect the TPM Endorsement Key
Disconnect any current connection.
Disconnect-VIServer -server * -Confirm:$falseConnect as the root user to one of the ESXi hosts in the Trusted Cluster.
Connect-VIServer -server 10.xxx.xx.xx -User root -Password xxxxxxxxConfirm the ESXi host.
Get-VMHostAssign Get-VMHost to a variable.
$vmhost = Get-VMHostExport the EK certificate of the ESXi host.
Export-Tpm2EndorsementKey -VMHost $vmhost -FilePath -FilePath C:\vta\tpm2ek-201.jsonThe file is created. Repeat the process for the other ESXi hosts you want to trust. Make sure the filename is different for each ESXi host.
Collect Information about the Trusted Cluster's vCenter Server
Export the Trusted Cluster’s vCenter Server principal information. To do so, first disconnect from the ESXi host.
Disconnect-VIServer -server * -Confirm:$falseConnect to the vCenter Server of the Trusted Cluster using the Trust Authority Administrator user.
Connect-VIServer -server 10.xxx.xx.xx -User trustedAdminTC -Password xxxxxxxxExport the Trusted Cluster’s vCenter Server principal information.
Export-TrustedPrincipal -FilePath C:\vta\trustedcluserprincipal-12.json
Import the Trusted Host Information to the Trust Authority Cluster
To import a TPM EK certificate into the Trust Authority Cluster, you must change the Trust Authority Cluster’s default attestation type to accept EK certificates. The default attestation type accepts TPM Certificate Authority (CA) certificates.
Disconnect from the ESXi host.
Disconnect-VIServer -server * -Confirm:$falseConnect as the Trust Authority Administrator user to the vCenter Server of the Trust Authority Cluster.
Connect-VIServer -server 10.xxx.xx.xx -User trustedadmin@vsphere.local -Password xxxxxxxxCheck the current state of the cluster.
Get-TrustAuthorityClusterAssign the Get-TrustAuthorityCluster cluster information to a variable.
$vTA = Get-TrustAuthorityCluster 'infrastructure'Assign the Get-TrustAuthorityTpm2AttestationSettings information to a variable.
$tpm2Settings = Get-TrustAuthorityTpm2AttestationSettings -TrustAuthorityCluster $VTARun the Set-TrustAuthorityTpm2AttestationSettings cmdlet, specifying RequireEndorsementKey. At the confirmation prompt, press Enter.
Set-TrustAuthorityTpm2AttestationSettings -Tpm2AttestationSettings $tpm2Settings -RequireEndorsementKeyOutput
Confirmation
Configure the Tpm2AttestationSettings 'TrustAuthorityTpm2AttestationSettings-domain-c2111' with the
following parameters:
RequireCertificateValidation: False
RequireEndorsementKey: True
[Y] Yes [A] Yes to All [N] No [L] No to All [S] Suspend [?] Help (default is "Y"):
Name    RequireEndorsementKey     RequireCertificateValidation    Health
----    ---------------------     -----------------------------   -----
TrustAuthorityTpm2AttestationSettings... True False               Ok
Connect to the VI server.
Connect-VIServer -server 10.xxx.xx.xx -User trustedadmin@vsphere.local -Password xxxxxxxxOutput
Name           Port  User
----           ----  ----
10.xxx.xx.xx   443   VSPHERE.LOCAL\trustedadmin
Store the the details of TrustAuthorityCluster in a vairiable vTA.
$vTA = Get-TrustAuthorityCluster 'infrastructure'
$vTA
Output
Name           State   Id
----           -----   --
Infrastructure Enabled TrustAuthorityCluster-domain-c40
Fetch the endorsement keys for the trust autority cluster.
New-TrustAuthorityTpm2EndorsementKey -TrustAuthorityCluster $vTA -FilePath C:\vta\tpm2ek-25.jsonImport the ESXi host base image information.
New-TrustAuthorityTpm2EndorsementKey -TrustAuthorityCluster $vTA -FilePath C:\vta\tpm2ek-27.jsonOutput
TrustAuthorityClusterId                  Name                                     Health
-----------------------                  ----                                     ------
TrustAuthorityCluster-domain-c40         34323550-3939-4d33-3144-323631314734     Ok
Import the ESXi host base image information.
New-TrustAuthorityVMHostBaseImage -TrustAuthorityCluster $VTA -FilePath C:\vta\image-esxi-25.tgzOutput
TrustAuthorityClusterId                  VMHostVersion                    Health
-----------------------                  -------------                    ------
TrustAuthorityCluster-domain-c40         ESXi 8.0.3-0.70.24674464         Ok
The Trust Authority Cluster knows which ESXi hosts it can remotely attest, and so, which hosts it can trust.
Create the Key Provider on the Trust Authority Cluster
Disconnect from all connections.
Disconnect-VIServer -server * -Confirm:$falseConnect to the vCenter Server of the Trust Authority Cluster.
Connect-VIServer -server vsphere-sunnyvale1.gemalto.com -User trustedadmin@vsphere.local -Password Asdf@1234Assign Get-TrustAuthorityCluster information to a variable called
$VTA.$VTA = Get-TrustAuthorityCluster 'Infrastructure'Create the trusted key provider using the
New-TrustAuthorityKeyProvidercmdlet.New-TrustAuthorityKeyProvider -TrustAuthorityCluster $VTA -PrimaryKeyId db781dcbdf42481c910117e19631efc0e9d4f39055074eb1b2eec842fd13a23c -Name KeyControl4 -KmipServerAddress 10.xxx.xx.xx -KmipServerPort xxxxUse the ID of the keys created earlier and assign a name. For example, KeyControl1.
Specify the IP address and the port of the CipherTrust Manager.
Each logical key provider must have a unique name across all vCenter Server systems.
To add multiple key servers to the key provider, use the
Add-TrustAuthorityKeyProviderServercmdlet.Establish the trusted connection so that the KeyControl server trusts the trusted key provider. Obtain the trusted key providers in the given Trust Authority Cluster.
$kp = Get-TrustAuthorityKeyProvider -TrustAuthorityCluster $VTA | Select-Object -First 1Upload the certificate and private key using the
Set-TrustAuthorityKeyProviderClientCertificatecommand.Set-TrustAuthorityKeyProviderClientCertificate -KeyProvider $kp -CertificateFilePath C:\Users\Administrator\Downloads\v-cert.pem -PrivateKeyFilePath C:\Users\Administrator\Downloads\v-key.pemAs a result, the trusted key provider has established trust with the key server. Finish the trust setup by uploading a key server certificate so that the trusted key provider trusts the key server.
Obtain the trusted key providers in the given Trust Authority Cluster.
$kp = Get-TrustAuthorityKeyProvider -TrustAuthorityCluster $VTA | Select-Object -First 1Get the key server server certificate. Initially, the certificate is not trusted, so the Trusted state is False. If you have more than one key server configured, a list of certificates is returned. Verify and add each certificate using the following instructions. Before trusting the certificate, assign
Get-TrustAuthorityKeyProviderServerCertificate -KeyProviderServer $kp.KeyProviderServersinformation to a variable.$cert = Get-TrustAuthorityKeyProviderServerCertificate -KeyProviderServer $kp.KeyProviderServersRun this command and verify the output.
$cert.Certificate.ToString()Output
[Subject]
CN=kmip.ciphertrustmanager.local, O=Thales, L=Austin, S=TX, C=US
[Issuer]
CN=CipherTrust Root CA, O=Thales, L=Austin, S=TX, C=US
[Serial Number]
39986905AFCCD708983A4CE975BC72D9
[Not Before]
6/10/2025 3:37:25 PM
[Not After]
9/14/2027 3:37:25 PM
[Thumbprint]
CC638805FCAF3E9E3CB1CB4B737E04078BF444D5
Add the KMIP server certificate to the trusted key provider.
Add-TrustAuthorityKeyProviderServerCertificate -ServerCertificate $certVerify the status of the key provider, by refreshing the key provider status.
$kp = Get-TrustAuthorityKeyProvider -TrustAuthorityCluster $VTAGet the key provider status.
$kp.StatusOutput
KeyProviderId          Health HealthDetails ServerStatus
-------------          ------ ------------- ------------
domain-c40-KeyControl4     Ok {}            {10.xxx.xx.xx}
Export the Trust Authority Cluster Information
After you have imported the vSphere Trust Authority Cluster information to the Trusted Cluster, the Trusted Hosts start the attestation process with the Trust Authority Cluster.
To import the Trust Authority Cluster information, Disconnect from all connections.
Disconnect-VIServer -server * -Confirm:$falseEnsure that you are connected as the Trust Authority Administrator to the vCenter Server of the Trusted Cluster.
Connect-VIServer -server vsphere-sunnyvale1.gemalto.com -User trustedadmin@vsphere.local -Password xxxxxxxxxExport the Trust Authority Cluster’s Attestation Service and Key Provider Information, this command exports the service information to the
clsettings.jsonfile.$VTA = Get-TrustAuthorityCluster 'Infrastructure' Export-TrustAuthorityServicesInfo -TrustAuthorityCluster $VTA -FilePath C:\vta\clsettings.jsonOutput
Mode                 LastWriteTime              Length          Name
----                 -------------              ------          ----
-a----              6/6/2025   9:42 PM          8352            clsettings.json
The file containing the Trust Authority Cluster information is created.
Import the Trust Authority Cluster Information to the Trusted Hosts
To import the Trust Authority Cluster information.
Disconnect from all connections:
Disconnect-VIServer -server * -Confirm:$falseEnsure that you are connected as the Trust Authority Administrator to the vCenter Server of the Trusted Cluster (Workload cluster).
Connect-VIServer -server TrustedCluster_VC_ip_address -User trust_admin_user -Password 'password'Verify that the state of the Trusted Cluster is Disabled.
Get-TrustedClusterAssign the Get-TrustedCluster information to a variable and verify its value.
$TC = Get-TrustedCluster -Name 'KMS-Cluster'Import the Trust Authority Cluster information to the vCenter Server. Use the
clsettings.jsonfile previously exported in "Export the Trust Authority Cluster Information".Import-TrustAuthorityServicesInfo -FilePath C:\vta\clsettings.jsonEnable the Trusted Cluster.
Set-TrustedCluster -TrustedCluster $TC -State EnabledOutput
Confirmation
Setting TrustedCluster 'KMS-Cluster' with new TrustedState 'Enabled'. Do you want to proceed?
[Y] Yes  [A] Yes to All  [N] No  [L] No to All  [S] Suspend  [?] Help (default is "Y"):
Name                 State                Id
----                 -----                --
KMS-Cluster          Enabled              TrustedCluster-domain-c9
Verify that the Attestation Service and the Key Provider Service are configured in the Trusted Cluster.
$TC = Get-TrustedCluster -Name 'KMS-Cluster'
$TC.AttestationServiceInfo
Output
ServiceAddress                 ServicePort          ServiceGroup
--------------                 -----------          ------------
10.xxx.xx.xx                   443                  host-45:xx7f8085-9ca1-446c-...
10.xxx.xx.xx                   443                  host-159846:xx7f8085-9ca1-4...
The ESXi Trusted Hosts in the Trusted Cluster begin the attestation process with the Trust Authority Cluster.
Configure the Trusted Key Provider for Trusted Hosts
Disconnect from all connections.
Disconnect-VIServer -server * -Confirm:$falseEnsure that you are connected as the Trust Authority Administrator to the vCenter Server of the Trusted Cluster (Workload cluster).
Connect-VIServer -server TrustedCluster_VC_ip_address -User trust_admin_user -Password 'password'Obtain the trusted key provider.
Get-KeyProviderYou can use the
-Nameoption to specify a single trusted key provider.Assign the Get-KeyProvider trusted key provider information to a variable.
$workload_kp = Get-KeyProviderIf you have multiple trusted key providers, you can use Select-Object to select one of them: (Optional)
$workload_kp = Get-KeyProvider | Select-Object -Index 0Register the trusted key provider.
Register-KeyProvider -KeyProvider $workload_kpOutput
Name            DefaultForSystem    ClientCertificateExpiryDate
----            ----------------    --------------------------
KeyControl1     False               1/1/0001  12:00:00 AM