
Integration of Dell EMC Data Domain
This section lists the steps to integrate Dell EMC Data Domain with CipherTrust Manager.
Prerequisites
This section provides the prerequisites for integration of Dell EMC Data Domain with CipherTrust Manager.
Ensure that the CipherTrust Manager is installed and configured. Refer to the CipherTrust Manager Documentation for more details.
Dell Data Domain communicates with the CipherTrust Manager using the KMIP interface. Ensure that the KMIP interface is configured on the CipherTrust Manager.
CipherTrust Manager IP address and KMIP interface port must be accessible from the Dell Data Domain system.
CipherTrust Manager recognizes only registered KMIP clients. Ensure that each node of the Dell Data Domain cluster is registered as a KMIP client on the CipherTrust Manager. Refer to KMIP Client Registration for more details.
Configuration on CipherTrust Manager
To configure the CipherTrust Manager, you need to perform the following steps:
Creating a Domain (Optional)
Perform the following steps to be performed on CipherTrust Manager:
Navigate to Admin Settings > Domains.
Click Add Domain. The Add Domain page appears.
Specify the following information:
Name - Enter the domain name.
Admins - Select the admins (one or more) from the list available in the drop down. For example, admin.
Parent CA - Select parent CA as root CA.
Allow Subdomain User Management - Select this check box if you want to enable the sub-domain user management through this domain.
Click Save.
Switch to the newly created domain by clicking the top right on the current Domain Name.
Creating a User
To create a user, perform the following steps:
Log on to the CipherTrust Manager GUI.
Open the Access Management application.
On the left navigation pane, click Users. The Users page is displayed.
On the Users page, click Add User.
On the Add User page, provide the following details:
Select the required Connection Type
Select the checkbox against the required Allowed Client Type.
Enter Full Name
Enter Username
Enter the desired Password. Re-enter the password in the Password Match field.
Click Add User. The newly created user will now appear on the Users page.
Note
To create a user in sub-domain, you must enable Allow Subdomain User management.
To create a user, perform the following steps:
Log on to the CipherTrust Manager GUI with the User you created within the sub-domain.
Open the Access Management application.
On the left pane, click Users. The Users page is displayed.
On the Users page, click Add User.
On the Add User page, provide the following details:
Select the required Connection Type
Select the checkbox against the required Allowed Client Type.
Enter Full Name
Enter Username
Enter Password. Re-enter the password in the Password Match field.
Click Add User. The newly created user will now appear on the Users page.
Assigning User to a Group
Perform the following steps to add user to a group:
Navigate to the Users page.
Click the ellipsis button (...) corresponding to the user that you created in the previous step.
Click Edit/View.
Click Group Memberships > Add Group.
In the search bar, enter the desired Group name and select the check box corresponding to it. For example, Key Admins or Key Users.
Click Add Group.
Creating or Adding a CA (Optional)
Note
Creating a CA is an optional step in this integration. However, it is recommended to select the CA carefully, as it will be used throughout the process.
Select the Local CA tab if you want to create a Local CA OR select the External CA tab if you wish to add the External CA.
To create/add a Self-signed local CA, perform the following steps:
Navigate to CA > Local. Select Add Local CA, the Add Local CA page appears.
Provide the required information and click Add Local CA. The created Local CA will appear under Pending CAs section.
Click the ellipsis against the Local CA that you created and select the option Self-sign.
Select a valid duration for the Local CA. Click Save.
To add an external CA, perform the following steps:
Navigate to CA > External. The External Certificate Authorities page appears. Select Add External CA, the Add External Certificate page appears.
Provide the required information.
If you want to upload the external CA, select the File Upload option and click Upload Certificate. Browse and select the required External CA.
OR
Select Text and paste the contents of External Certificate.
Click Add External CA.
Registering a KMIP Client
You can register a KMIP client on the CipherTrust Manager through:
Auto Registration
Manual Registration
Log on to the CipherTrust Manager.
Go to Products > KMIP.
Create Client Profile using the following steps:
Navigate to Client Profile and click Add Profile.
Add a Profile Name.
Click Save. The new profile is created.
Create Registration Token using the following steps:
Go to Registration Token and click New Registration Token > Begin.
Add a Name Prefix.
Specify a Token Lifetime value along with the Client Capacity for the token.
Click Select CA.
Select the CA type as Local/External depending on CA that you created above.
Select the appropriate CA from the dropdown menu and click Select Profile.
Select the Client Profile from the dropdown which you have created in the above step.
Click Create Token.
Copy the value of the Token created and click Done.
Note
If you are using External CA then you can select the external CA that you created above and uploaded on the CipherTrust Manager.
Turn ON Auto Registration using the following steps:
Go to Admin Settings > Interfaces.
Click the ellipsis button (...) corresponding to the kmip interface.
Click View/Edit.
On the Interface Detail window, perform the following:
Select the Interface Mode as TLS, verify client cert, user name taken from client cert, auth request is optional.
Select Auto Registration checkbox.
Paste the
Registration Token.Add the CA (Local or External) to the list of Trusted CAs. The CA will reflect uder the dropdown menu of Local/External Trusted CAs depending upon CA that you created above.
Click Update.
Log on to the CipherTrust Manager.
Go to Products > KMIP.
Create Client Profile using the following steps:
Go to Client Profile and click Add Profile.
Add a Profile Name.
Select CN in Username Location in Certificate.
Click Certificate Details.
You can either paste the content of a generated
client.csror you can create one, by filling in the required details.Click Save.
Create Registration Token using the following steps:
Go to Registration Token and click New Registration Token > Begin.
Add a Name Prefix.
Specify a Token Lifetime value along with the Client Capacity for the token.
Click Select CA.
Select the CA type as Local/External depending on the CA type that you created above.
Select the appropriate CA from the dropdown menu and click Select Profile.
Select the Client Profile from the dropdown which you have created in the above step.
Click Create Token.
Copy the value of the Token created and click Done.
Note
If you are using External CA then you can select the external CA that you created above and uploaded on the CipherTrust Manager.
Go to Registered Clients and click Add Client.
Specify client name and paste the Registration Token that you generated in the above step.
Note
If you are using external CA then you can either upload the client certificate as a file using Upload Certificate or paste the signed client certificate in the Client Certificate field.
Click Save to save the client certificate.
You can register a KMIP client on the CipherTrust Manager through:
Auto Registration
Manual Registration
Log on to the CipherTrust Manager into your domain.
Go to Products > KMIP.
Create Client Profile using the following steps:
Navigate to Client Profile and click Add Profile.
Add a Profile Name.
Click Save. The new profile is created.
Create Registration Token using the following steps:
Go to Registration Token and click New Registration Token > Begin.
Add a Name Prefix.
Specify a Token Lifetime value along with the Client Capacity for the token.
Click Select CA.
Select the CA type as Local/External depending on CA that you created above.
Select the appropriate CA from the dropdown menu and click Select Profile.
Select the Client Profile from the dropdown which you have created in the above step.
Click Create Token.
Copy the value of the Token created and click Done.
Note
If you are using External CA then you can select the external CA that you created above and uploaded on the CipherTrust Manager.
Turn ON Auto Registration using the following steps:
Go to Admin Settings > Interfaces.
Click the ellipsis button (...) corresponding to the kmip interface.
Click Edit.
On the Interface Detail window, perform the following:
Select the Interface Mode as TLS, verify client cert, user name taken from client cert, auth request is optional.
Select Auto Registration checkbox.
Paste the
Registration Token.Add the CA (Local or External) to the list of Trusted CAs. The CA will reflect uder the dropdown menu of Local/External Trusted CAs depending upon CA that you created above.
Click Update.
Log on to the CipherTrust Manager into your domain.
Go to Products > KMIP.
Create Client Profile using the following steps:
Go to Client Profile and click Add Profile.
Add a Profile Name.
Select CN in Username Location in Certificate.
Expand the Certificate Details section.
You can either paste the content of a generated
client.csror you can create one, by filling in the required details.For domain, the format to enter the Common Name field of the cert is always:
domainName||domainUserClick Save.
Create a Registration Token using the following steps:
Go to Registration Token and click New Registration Token > Begin.
Add a Name Prefix.
Specify a Token Lifetime value along with the Client Capacity for the token.
Click Select CA.
Select the CA type as Local/External depending on CA that you created above.
Select the appropriate CA from the dropdown menu and click Select Profile.
Select the Client Profile from the dropdown which you have created in the above step.
Click Create Token.
Copy the value of the Token created and click Done.
If you are using External CA then you can select the external CA which you created earlier. Refer to External CA under Creating or Adding a CA.
Go to Registered Clients and click Add Client.
- Specify client name and paste the Registration Token generated in the above step.
Note
If you are using external CA then you need to paste the signed client certificate in the Client Certificate field.
- Click Save to save the client certificate.
Configuring the KMIP Interface
The KMIP interface can be configured through:
Go to Admin Settings > Interfaces.
On the KMIP Interface, click the ellipsis button (...) and then click View/Edit.
Select the Auto Registration checkbox if you auto-registered your KMIP client and paste the value of the registration token that you created.
Note
By default, the Auto Registration is disabled.
Select the mode as TLS, verify client cert, user name taken from client cert, auth request is optional.
Specify selections for Local CA for Automatic Server Certificate Generation as desired.
Note
In case of External CA, Local CA for Automatic Server Certificate Generation should be set to Turn off auto generation from Local CA.
Depending upon the CA that you created above, select an option from the following::
If you are using Local CA then select the CA under Local Trusted CAs
If you are using External CA then select the CA under External Trusted CAs, provided you have the external CA that you created and uploaded on the CipherTrust Manager. For more information on creating or uploading CA, refer to Creating or Adding a CA.
Select the CA according to your preference.
Login to your sub-domain. Go to CA > Local. Click the ellipsis (...) and copy the contents of your CA Certificate.
Logout of your sub-domain and now login to the root domain.
Go to CA > External > Add External CA.
Enter a name for this Domain CA and select the text radio button and paste the certificate contents.
Click Add External CA.
Go to Admin Settings > Interfaces.
Click the Add icon to add the External CA.
Click Update.
Note
If you are using an External CA in the Sub-Domain, you need to add the CA as an External CA in both the root domain as well as the sub-domain and modify the interface accordingly.
Login to your sub-domain. Go to CA > Local. Click the ellipsis (...) and copy the contents of your CA Certificate.
Logout of your sub-domain and now login to the root domain.
Go to CA > External > Add External CA.
Enter a name for this Domain CA and select the text radio button and paste the certificate contents.
Click Add External CA.
Go to Admin Settings > Interfaces.
Click the Add icon to add the External CA.
Click Update.
On the KMIP interface, click the ellipsis (...) > Certificate Options > Upload New Certificate > Ok.
Select the Certificate Chain option and click Build Certificate Chain.
Click on Text and paste the contents of Server Certificate, CA, and Server Key file in the same order. Do not introduce any space, character or symbol between the contents of these files.
Select certificate Format as PEM.
Click on Upload Certificate.
On the KMIP Interface, click the ellipsis button (...) and then click View/Edit.
Select the Auto Registration checkbox if you auto-registered your KMIP client and paste the value of the registration token that you created.
Note
By default, the Auto Registration is disabled.
Select the mode as TLS, verify client cert, user name taken from client cert, auth request is optional.
Specify selections for Local CA for Automatic Server Certificate Generation as desired.
Note
In case of External CA, Local CA for Automatic Server Certificate Generation should be set to Turn off auto generation from Local CA.
Configuration on Dell EMC Data Domain
Using GUI
This section provides the steps for integrating Dell Data Domain with the CipherTrust Manager in the sequence mentioned below.
The steps below indicate where the step takes place (CM = CipherTrust Manager, DD = Data Domain).
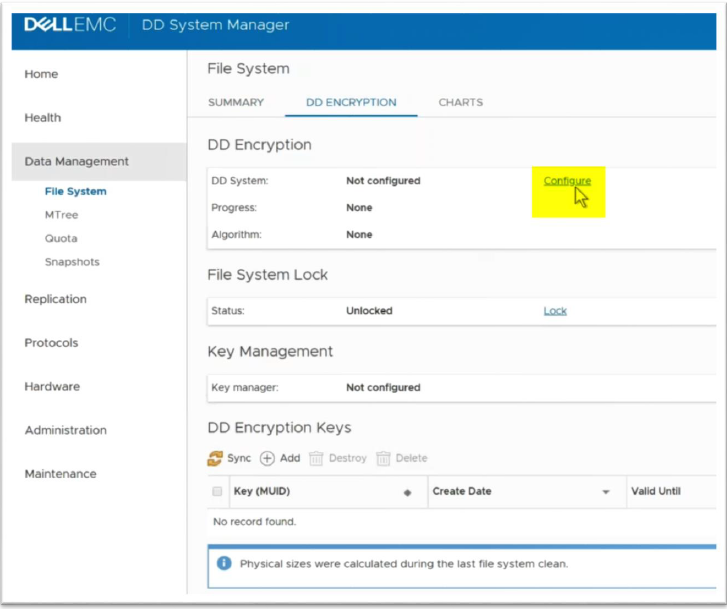
Enable DD Encryption
In DD, select Data Management -> File System -> DD Encryption -> Configure:
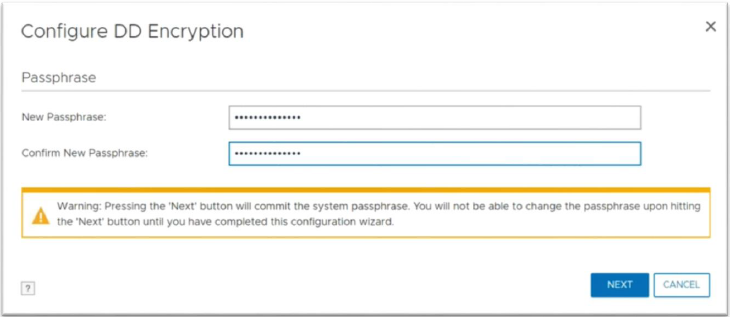
Configure DD Encryption Passphrase:
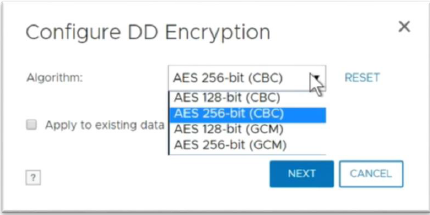
Select AES 256 CBC from the Algorithm dropdown:
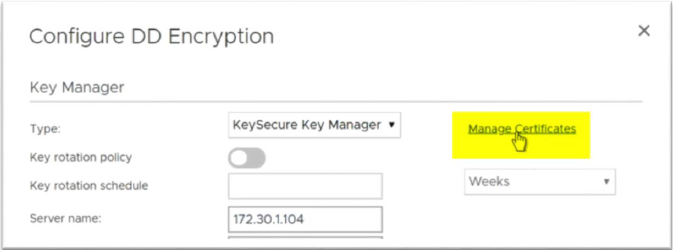
Select CipherTrust Manager Key Manager as the external key manager:

Prepare TLS certificates (DD)
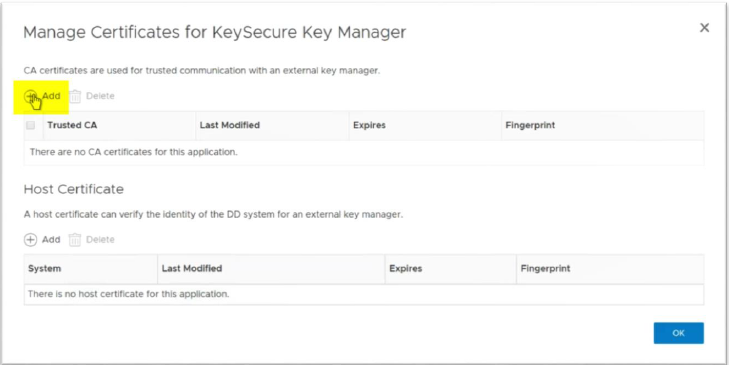
On the Configure DD Encryption window, select Manage Certificates:
Upload CA into Data Domain (DD)
On the DD Encryption -> Manage Certificates, select Add to upload the CA certificate:
Upload your root CA
certificate.pemfile downloaded from CipherTrust Manager: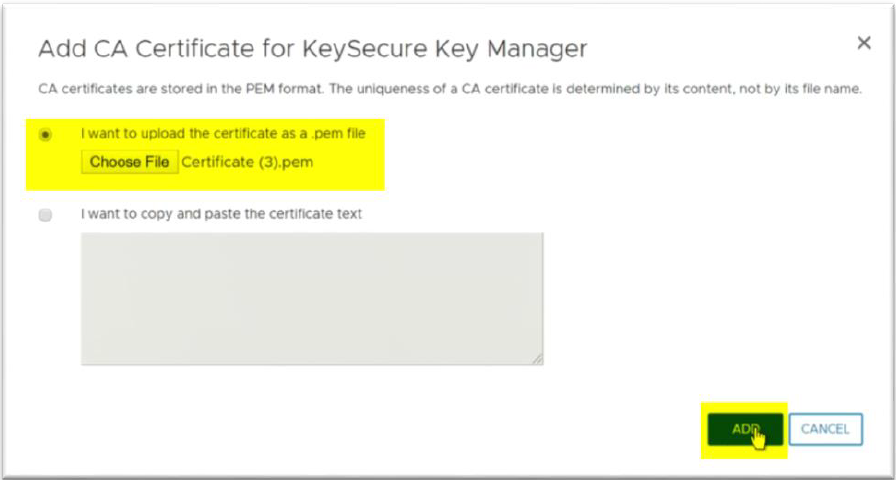
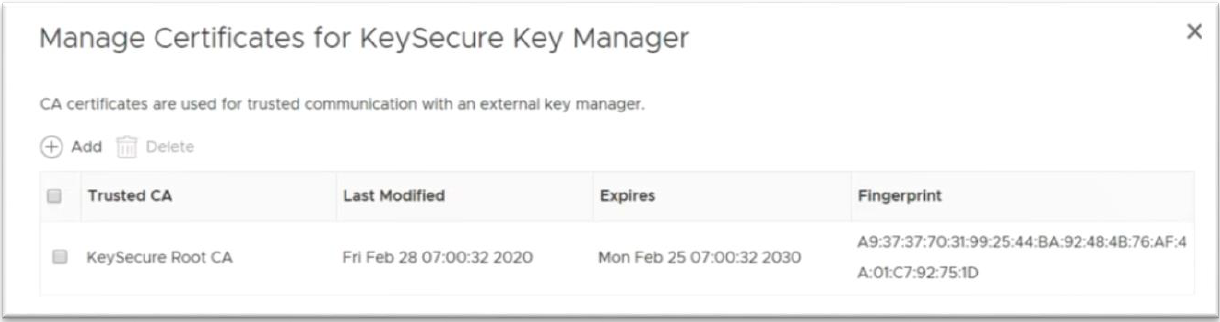
You should see your CipherTrust Manager CA now:
Create and sign Data Domain client certificate
Select Add host certificate:

Select Generate CSR on Data Domain:
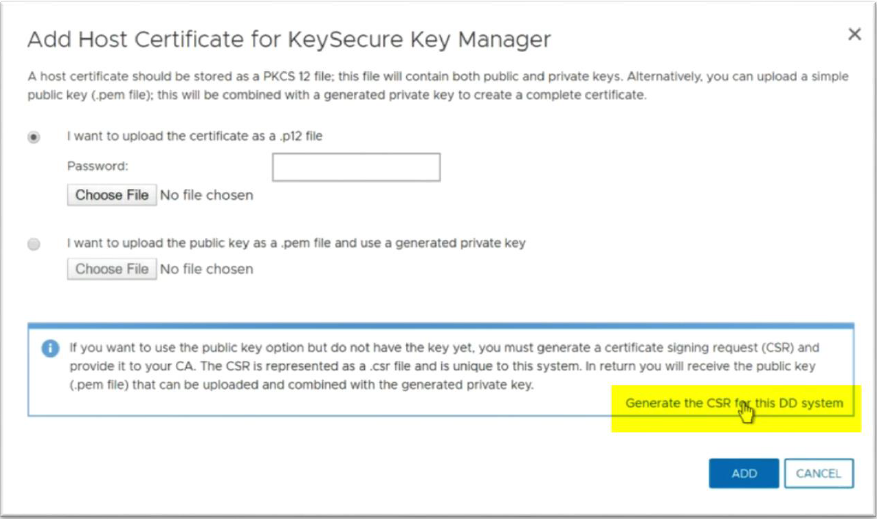
Fill the CSR fields and then select Generate and download a CSR. This gives you a
csr.pemfile: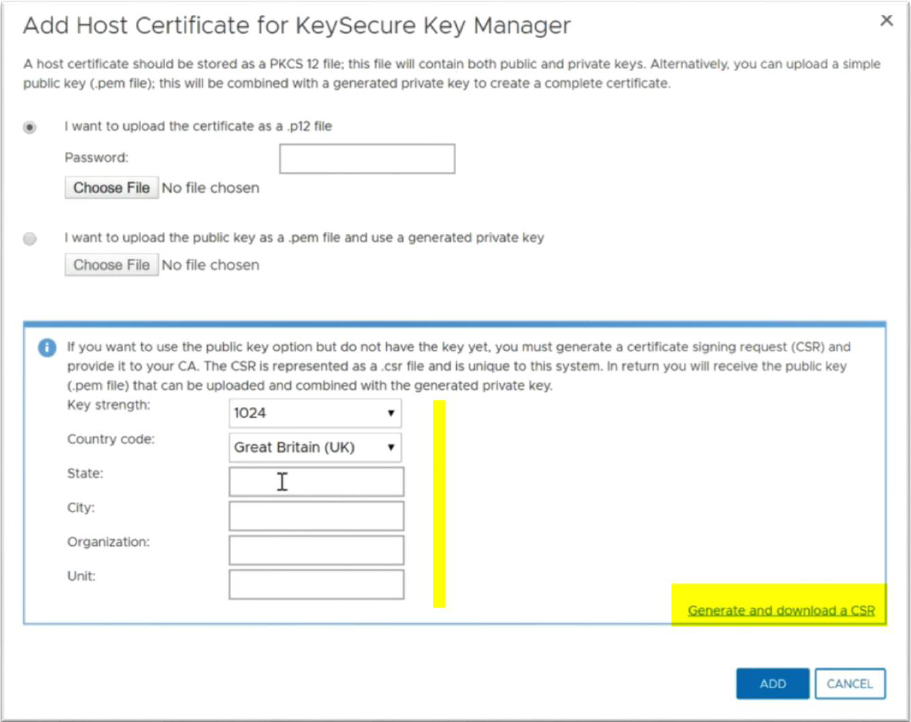
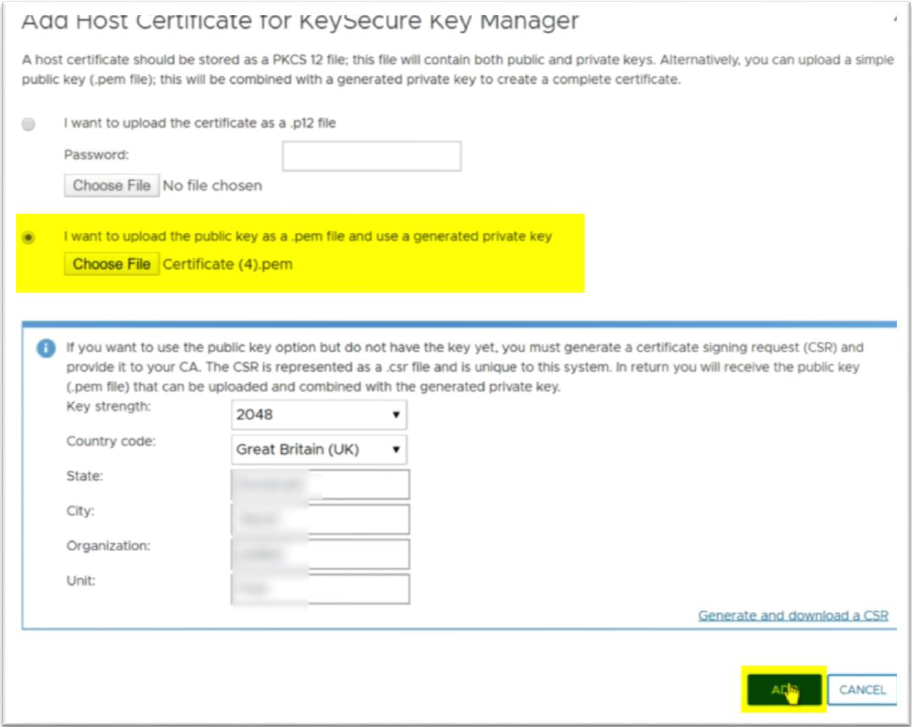
Open and copy the
.pemfile content. Sign the CSR in CipherTrust Manager using the CA certificate. The CA must be the same as the KMIP interface CA – configured by default in CipherTrust Manager.In CipherTrust Manager, select Keys & Access Management -> CA -> select your CA -> Select Upload and Sign CSR.
Paste the CSR, select ‘Client’ in the Certificate Purpose and click Issue Certificate.
Download the new Client certificate from CipherTrust Manager.
Upload the certificate to Data Domain:
You should now see your new Client(Host) certificate in Data Domain. Now, copy the CN value:
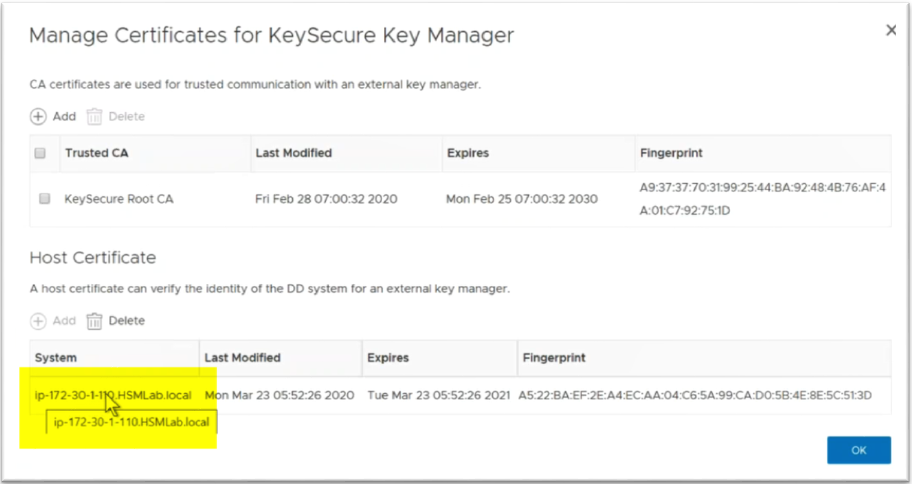
Create new user in CipherTrust Manager for Data Domain (CM)
In CipherTrust Manager, navigate to Keys & Access Management -> Users -> Add user.
a. Create a new user and paste the CN of Data Domain client certificate copied earlier in the Username field. In our case
ip-172-30-1-110…HSMLab.localwill be the username.b. Enter a password. Ensure ‘Require user to change password on next login’ is not selected.
Assign the new user permissions to keys. In Keys & Access Management -> Users, select the new users. In Groups, select Key User.
Create key including application_data for key-class attributes (CM)
In CipherTrust Manager Keys & Access Management > Keys, create a new AES 256 key.
The owner needs to be the user assigned to Data Domain. In our case, it is
ip-172-30-1-110…HSMLab.local.Add application data into key metadata. This will be the Key-Class attribute required by Data Domain.
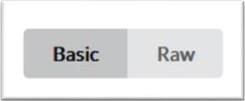
a. Modify the Raw information of the key. When you are in the Create Key page, select ‘RAW’ under the Groups:
b. You will see:
    {
     "ownerId": "local|ccae093c-7bdf-47e3-88a1-8b9e5e32510e",
     "permissions": {}
    }
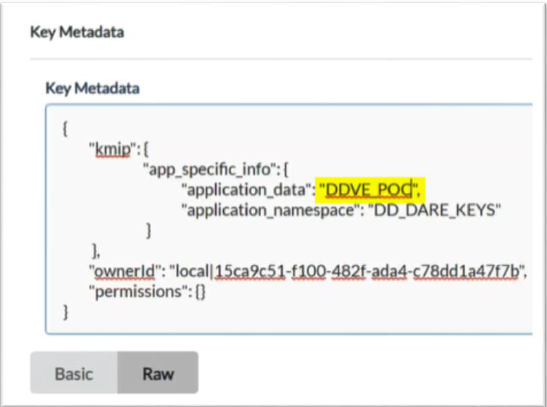
Modify the information as below – add the new app parameters (do not change the existing ones). Remember that the application_data value is your ‘Key Class’ name in Data Domain config. The value “DD_DARE_KEYS” is not changeable:
    {
        "kmip":{
            "app_specific_info":{
                "application_data": "DDVE_POC",
                "application_namespace": "DD_DARE_KEYS"
                }
        },
        "ownerId": "local|ccae093c-7bdf-47e3-88a1-8b9e5e32510e",
        "permissions": {}
    }
JSON is sensitive on indentation and the spaces on new line must be ‘ ‘ spaces, not tabs.
Finish Key management configuration in Data Domain
Now we are ready to fill the last fields in Data Domain and register new key manager:
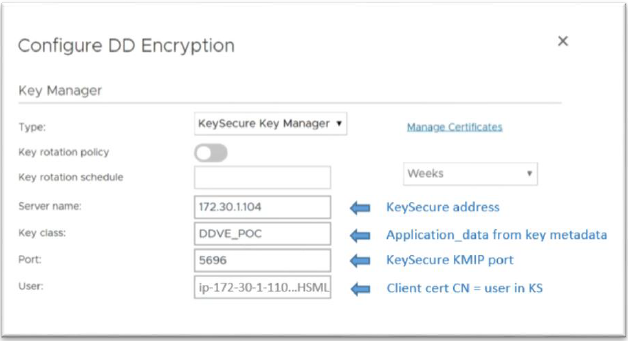
Ensure all values are correct and click next.
Review the changes. The encryption will only be applied after the file system restarts. Select Restart file system now:
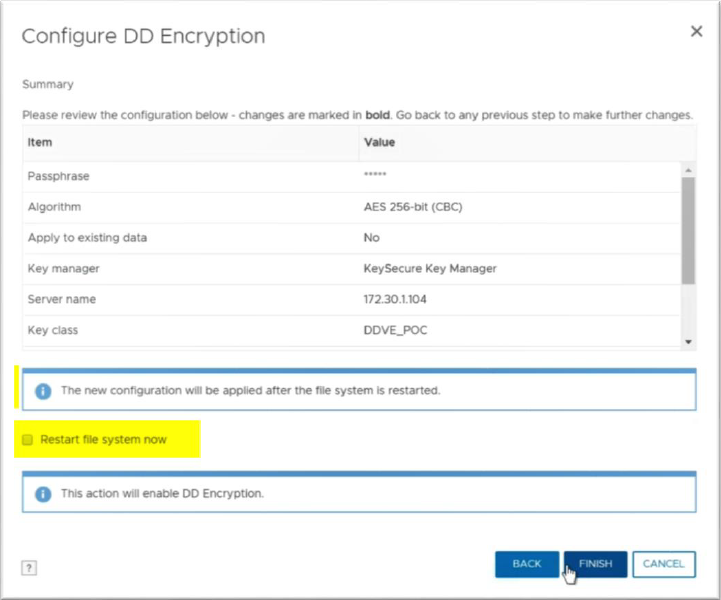
After restarting the file system, restart the DD filesystem to activate the new key manager.
If you face any issues:
See the Troubleshooting section to review the possible errors and their troubleshooting steps. (check network, check the key manager configuration)
In case of an error, you may not be able to change the configuration from the DD GUI. You can use the the CLI to resolve the error, see Configure Data Domain Using CLI.
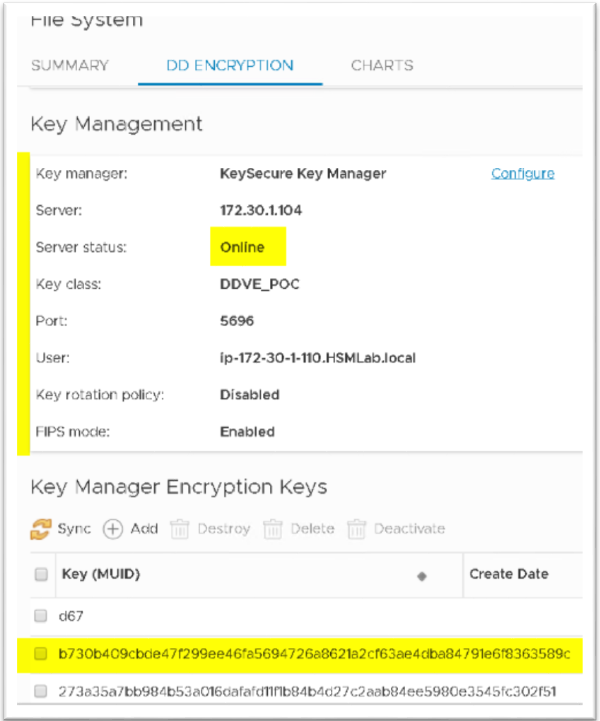
When successful:
In DD, you should see your key manager configuration and the key(s) from CipherTrust Manager loaded:
In CipherTrust Manager:
- You should also see successful login log in CipherTrust Manager Records:
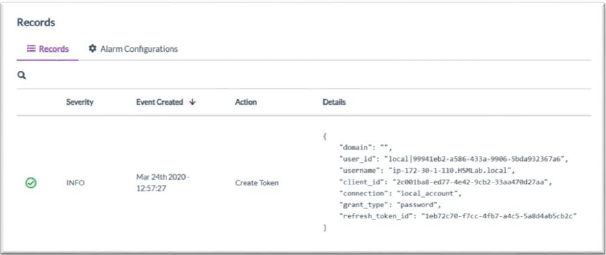
- You will also see “Key Export” in the CipherTrust Manager Records and access to the key when the Encryption is enabled on Data Domain.
You can also try creating more key versions in CipherTrust Manager, then Sync Keys in Data Domain configuration. You will see the new keys available and the automatic key life-cycle management visible in Data Domain
Using CLI
Data Domain CLI is a powerful tool. All the configuration can be done through CLI if preferred. The DD CLI would be also used for any troubleshooting. See below the useful commands.
Login to Data Domain using ssh and sysadmin user. You should see something like below:
    Welcome to Data Domain OS 7.1.0.5-643969
----------------------------------------
**
** NOTICE: There is 1 outstanding alert. Run "alerts show current"
** to display outstanding alert(s).
**
sysadmin@ip-172-30-1-110#
1. Useful commands
Configuring key manager
sysadmin@ip-172-30-1-110# filesys encryption key-manager set server 172.30.1.104 port 5696 key-class DDVE_POC server-type CipherTrust Manager kmip-user ip-172-30-1-110.HSMLab.local
The current key-manager configuration is:
    Key Manager: Disabled
    Server Type: CipherTrust Manager
    Server: 172.30.1.104
    Port: 5696
    Status: Online
    Key-class: DDVE_POC
    KMIP-user: ip-172-30-1-110.HSMLab.local
    Key rotation period: not-configured
    Last key rotation date: N/A
    Next key rotation date: N/A
Showing key manager configuration
sysadmin@ip-172-30-1-110# filesys encryption key-manager show
The current key-manager configuration is:
    Key Manager: Enabled
    Server Type: CipherTrust Manager
    Server: 172.30.1.104
    Port: 5696
    Status: Online
    Key-class: DDVE_POC
    KMIP-user: ip-172-30-1-110.HSMLab.local
    Key rotation period: not-configured
    Last key rotation date: N/A
    Next key rotation date: N/A
Notice if the key manager is Enabled or Disabled. And if it’s online or offline.
Showing Encryption status
    sysadmin@ip-172-30-1-110# filesys encryption show
    Tier Unit-name Enabled
    ------ --------- ------- active - yes
    ------ --------- -------
    The filesystem is unlocked
    Algorithm: aes_256_cbc
    Key manager in use: CipherTrust Manager
    Server: 172.30.1.104
    Port: 5696 Status: Online
    Key-class: DDVE_POC
    KMIP-user: ip-172-30-1-110.HSMLab.local
    Key rotation period: not-configured
    Last key rotation date: N/A
    Next key rotation date: N/A
Showing Encryption keys
    sysadmin@ip-172-30-1-110# filesys encryption keys show
    Active Tier:
    Key Key State Size
    Id MUID post-comp
    --- ---------------------------------------------------------------- ------------ ---------
    1 d67 Deactivated 0
    2 b730b409cbde47f299ee46fa5694726a8621a2cf63ae4dba84791e6f8363589c Activated-RW 0
    --- ---------------------------------------------------------------- ------------ ---------
    * Post-comp size is based on last cleaning of Tue Mar 24 06:06:13 2020.
    sysadmin@ip-172-30-1-110# filesys encryption keys show detailed
    Active Tier:
    Key Key State Size Key Manager Min-Cid Max-Cid
    Id MUID post-comp Type
    --- ---------------------------------------------------------------- ------------ --------- ----------- ------- -------
    1 d67 Deactivated 0 DataDomain 47 78
    2 b730b409cbde47f299ee46fa5694726a8621a2cf63ae4dba84791e6f8363589c Activated-RW 0 CipherTrust Manager 79 -
    --- ---------------------------------------------------------------- ------------ --------- ----------- ------- -------
    * Post-comp size is based on last cleaning of Tue Mar 24 06:06:13 2020.
You can also try creating more key versions in CipherTrust Manager, when keys are synchronized in Data Domain configuration. The new keys available and the automatic key life-cycle management is visible in Data Domain.
Note
DD logs: All KMIP initialization and transactions logs are available through CLI, listed in: /ddr/var/log/debug/kmip.log
When using the DD GUI: Careful, when key management configuration is interrupted, or when the config is not correct the first time, the GUI will lock down and will request a security user to login through CLI. You can continue through the CLI (ssh into the DD). It provides all configuration options and enables to see the encryption status. In this guide, we used both GUI and CLI.