
Integration of Dell ML3 Library Tape
This section lists the steps to integrate Dell ML3 Library Tape with CipherTrust Manager.
Prerequisites
This section provides the prerequisites for integration of Dell ML3 Library Tape with CipherTrust Manager.
Communication between DELL Device and the KMIP Server (CIPHERTRUST MANAGER) - must be allowed
KMIP port (5696) must be opened
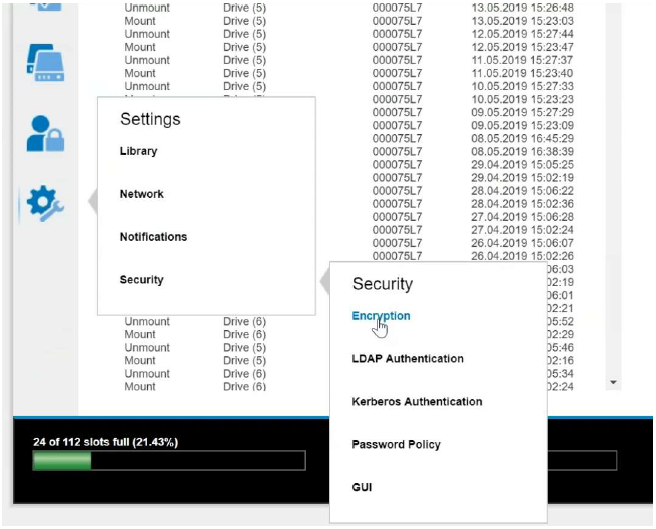
LME feature must be enabled on the DELL device: Settings > Security > Licensed features
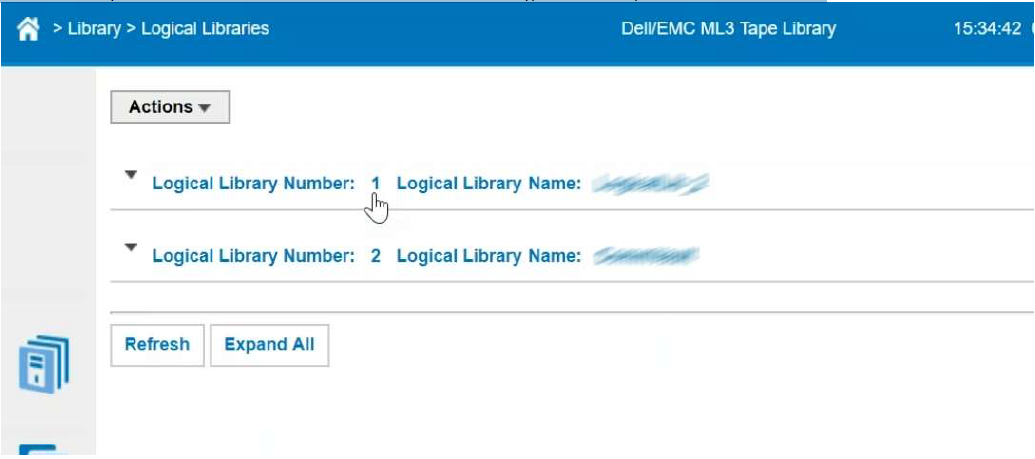
There must be as many KMIP licenses in CM as there are Libraries to enable for encryption. For example, two licenses in this case:
Note
LME (LIBRARY MANAGED ENCRYPTION) feature is by default embedded in the DELL device
Two versions of LME are available
KMIP (V1.2)
SKLM (Security Key Life Cycle Manager) for z/OS encryption
Configuration on CipherTrust Manager
To configure the CipherTrust Manager, you need to perform the following steps:
To configure the CipherTrust Manager, you need to perform the following steps:
Creating a Domain (Optional)
Perform the following steps to be performed on CipherTrust Manager:
Navigate to Admin Settings > Domains.
Click Add Domain. The Add Domain page appears.
Specify the following information:
Name - Enter the domain name.
Admins - Select the admins (one or more) from the list available in the drop down. For example, admin.
Parent CA - Select parent CA as root CA.
Allow Subdomain User Management - Select this check box if you want to enable the sub-domain user management through this domain.
Click Save.
Switch to the newly created domain by clicking the top right on the current Domain Name.
Creating a User
To create a user, perform the following steps:
Log on to the CipherTrust Manager GUI.
Open the Access Management application.
On the left navigation pane, click Users. The Users page is displayed.
On the Users page, click Add User.
On the Add User page, provide the following details:
Select the required Connection Type
Select the checkbox against the required Allowed Client Type.
Enter Full Name
Enter Username
Enter the desired Password. Re-enter the password in the Password Match field.
Click Add User. The newly created user will now appear on the Users page.
Note
To create a user in sub-domain, you must enable Allow Subdomain User management.
To create a user, perform the following steps:
Log on to the CipherTrust Manager GUI with the User you created within the sub-domain.
Open the Access Management application.
On the left pane, click Users. The Users page is displayed.
On the Users page, click Add User.
On the Add User page, provide the following details:
Select the required Connection Type
Select the checkbox against the required Allowed Client Type.
Enter Full Name
Enter Username
Enter Password. Re-enter the password in the Password Match field.
Click Add User. The newly created user will now appear on the Users page.
Assigning User to a Group
Perform the following steps to add user to a group:
Navigate to the Users page.
Click the ellipsis button (...) corresponding to the user that you created in the previous step.
Click Edit/View.
Click Group Memberships > Add Group.
In the search bar, enter the desired Group name and select the check box corresponding to it. For example, Key Admins or Key Users.
Click Add Group.
Creating or Adding a CA (Optional)
Note
Creating a CA is an optional step in this integration. However, it is recommended to select the CA carefully, as it will be used throughout the process.
Select the Local CA tab if you want to create a Local CA OR select the External CA tab if you wish to add the External CA.
To create/add a Self-signed local CA, perform the following steps:
Navigate to CA > Local. Select Add Local CA, the Add Local CA page appears.
Provide the required information and click Add Local CA. The created Local CA will appear under Pending CAs section.
Click the ellipsis against the Local CA that you created and select the option Self-sign.
Select a valid duration for the Local CA. Click Save.
To add an external CA, perform the following steps:
Navigate to CA > External. The External Certificate Authorities page appears. Select Add External CA, the Add External Certificate page appears.
Provide the required information.
If you want to upload the external CA, select the File Upload option and click Upload Certificate. Browse and select the required External CA.
OR
Select Text and paste the contents of External Certificate.
Click Add External CA.
Registering a KMIP Client
You can register a KMIP client on the CipherTrust Manager through:
Auto Registration
Manual Registration
Log on to the CipherTrust Manager.
Go to Products > KMIP.
Create Client Profile using the following steps:
Navigate to Client Profile and click Add Profile.
Add a Profile Name.
Click Save. The new profile is created.
Create Registration Token using the following steps:
Go to Registration Token and click New Registration Token > Begin.
Add a Name Prefix.
Specify a Token Lifetime value along with the Client Capacity for the token.
Click Select CA.
Select the CA type as Local/External depending on CA that you created above.
Select the appropriate CA from the dropdown menu and click Select Profile.
Select the Client Profile from the dropdown which you have created in the above step.
Click Create Token.
Copy the value of the Token created and click Done.
Note
If you are using External CA then you can select the external CA that you created above and uploaded on the CipherTrust Manager.
Turn ON Auto Registration using the following steps:
Go to Admin Settings > Interfaces.
Click the ellipsis button (...) corresponding to the kmip interface.
Click View/Edit.
On the Interface Detail window, perform the following:
Select the Interface Mode as TLS, verify client cert, user name taken from client cert, auth request is optional.
Select Auto Registration checkbox.
Paste the
Registration Token.Add the CA (Local or External) to the list of Trusted CAs. The CA will reflect uder the dropdown menu of Local/External Trusted CAs depending upon CA that you created above.
Click Update.
Log on to the CipherTrust Manager.
Go to Products > KMIP.
Create Client Profile using the following steps:
Go to Client Profile and click Add Profile.
Add a Profile Name.
Select CN in Username Location in Certificate.
Click Certificate Details.
You can either paste the content of a generated
client.csror you can create one, by filling in the required details.Click Save.
Create Registration Token using the following steps:
Go to Registration Token and click New Registration Token > Begin.
Add a Name Prefix.
Specify a Token Lifetime value along with the Client Capacity for the token.
Click Select CA.
Select the CA type as Local/External depending on the CA type that you created above.
Select the appropriate CA from the dropdown menu and click Select Profile.
Select the Client Profile from the dropdown which you have created in the above step.
Click Create Token.
Copy the value of the Token created and click Done.
Note
If you are using External CA then you can select the external CA that you created above and uploaded on the CipherTrust Manager.
Go to Registered Clients and click Add Client.
Specify client name and paste the Registration Token that you generated in the above step.
Note
If you are using external CA then you can either upload the client certificate as a file using Upload Certificate or paste the signed client certificate in the Client Certificate field.
Click Save to save the client certificate.
You can register a KMIP client on the CipherTrust Manager through:
Auto Registration
Manual Registration
Log on to the CipherTrust Manager into your domain.
Go to Products > KMIP.
Create Client Profile using the following steps:
Navigate to Client Profile and click Add Profile.
Add a Profile Name.
Click Save. The new profile is created.
Create Registration Token using the following steps:
Go to Registration Token and click New Registration Token > Begin.
Add a Name Prefix.
Specify a Token Lifetime value along with the Client Capacity for the token.
Click Select CA.
Select the CA type as Local/External depending on CA that you created above.
Select the appropriate CA from the dropdown menu and click Select Profile.
Select the Client Profile from the dropdown which you have created in the above step.
Click Create Token.
Copy the value of the Token created and click Done.
Note
If you are using External CA then you can select the external CA that you created above and uploaded on the CipherTrust Manager.
Turn ON Auto Registration using the following steps:
Go to Admin Settings > Interfaces.
Click the ellipsis button (...) corresponding to the kmip interface.
Click Edit.
On the Interface Detail window, perform the following:
Select the Interface Mode as TLS, verify client cert, user name taken from client cert, auth request is optional.
Select Auto Registration checkbox.
Paste the
Registration Token.Add the CA (Local or External) to the list of Trusted CAs. The CA will reflect uder the dropdown menu of Local/External Trusted CAs depending upon CA that you created above.
Click Update.
Log on to the CipherTrust Manager into your domain.
Go to Products > KMIP.
Create Client Profile using the following steps:
Go to Client Profile and click Add Profile.
Add a Profile Name.
Select CN in Username Location in Certificate.
Expand the Certificate Details section.
You can either paste the content of a generated
client.csror you can create one, by filling in the required details.For domain, the format to enter the Common Name field of the cert is always:
domainName||domainUserClick Save.
Create a Registration Token using the following steps:
Go to Registration Token and click New Registration Token > Begin.
Add a Name Prefix.
Specify a Token Lifetime value along with the Client Capacity for the token.
Click Select CA.
Select the CA type as Local/External depending on CA that you created above.
Select the appropriate CA from the dropdown menu and click Select Profile.
Select the Client Profile from the dropdown which you have created in the above step.
Click Create Token.
Copy the value of the Token created and click Done.
If you are using External CA then you can select the external CA which you created earlier. Refer to External CA under Creating or Adding a CA.
Go to Registered Clients and click Add Client.
- Specify client name and paste the Registration Token generated in the above step.
Note
If you are using external CA then you need to paste the signed client certificate in the Client Certificate field.
- Click Save to save the client certificate.
Configuring the KMIP Interface
The KMIP interface can be configured through:
Go to Admin Settings > Interfaces.
On the KMIP Interface, click the ellipsis button (...) and then click View/Edit.
Select the Auto Registration checkbox if you auto-registered your KMIP client and paste the value of the registration token that you created.
Note
By default, the Auto Registration is disabled.
Select the mode as TLS, verify client cert, user name taken from client cert, auth request is optional.
Specify selections for Local CA for Automatic Server Certificate Generation as desired.
Note
In case of External CA, Local CA for Automatic Server Certificate Generation should be set to Turn off auto generation from Local CA.
Depending upon the CA that you created above, select an option from the following::
If you are using Local CA then select the CA under Local Trusted CAs
If you are using External CA then select the CA under External Trusted CAs, provided you have the external CA that you created and uploaded on the CipherTrust Manager. For more information on creating or uploading CA, refer to Creating or Adding a CA.
Select the CA according to your preference.
Login to your sub-domain. Go to CA > Local. Click the ellipsis (...) and copy the contents of your CA Certificate.
Logout of your sub-domain and now login to the root domain.
Go to CA > External > Add External CA.
Enter a name for this Domain CA and select the text radio button and paste the certificate contents.
Click Add External CA.
Go to Admin Settings > Interfaces.
Click the Add icon to add the External CA.
Click Update.
Note
If you are using an External CA in the Sub-Domain, you need to add the CA as an External CA in both the root domain as well as the sub-domain and modify the interface accordingly.
Login to your sub-domain. Go to CA > Local. Click the ellipsis (...) and copy the contents of your CA Certificate.
Logout of your sub-domain and now login to the root domain.
Go to CA > External > Add External CA.
Enter a name for this Domain CA and select the text radio button and paste the certificate contents.
Click Add External CA.
Go to Admin Settings > Interfaces.
Click the Add icon to add the External CA.
Click Update.
On the KMIP interface, click the ellipsis (...) > Certificate Options > Upload New Certificate > Ok.
Select the Certificate Chain option and click Build Certificate Chain.
Click on Text and paste the contents of Server Certificate, CA, and Server Key file in the same order. Do not introduce any space, character or symbol between the contents of these files.
Select certificate Format as PEM.
Click on Upload Certificate.
On the KMIP Interface, click the ellipsis button (...) and then click View/Edit.
Select the Auto Registration checkbox if you auto-registered your KMIP client and paste the value of the registration token that you created.
Note
By default, the Auto Registration is disabled.
Select the mode as TLS, verify client cert, user name taken from client cert, auth request is optional.
Specify selections for Local CA for Automatic Server Certificate Generation as desired.
Note
In case of External CA, Local CA for Automatic Server Certificate Generation should be set to Turn off auto generation from Local CA.
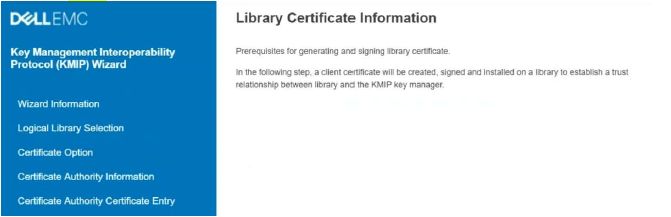
Configuration on Dell ML3
To configure the Dell ML3, you need to perform the following steps:
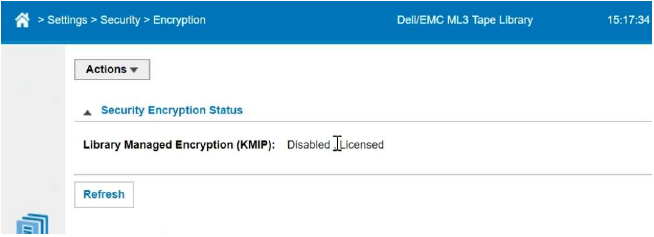
Click on the Settings > Security > Encryption. (It should show Library Managed Encryption (KMIP) – Disabled, Licensed)
Note
If Encryption setting shows Application Manager Encryption, see Appendix.
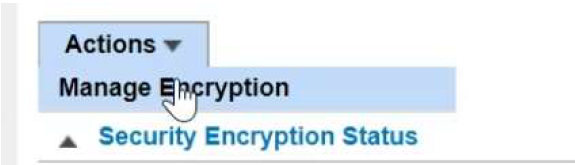
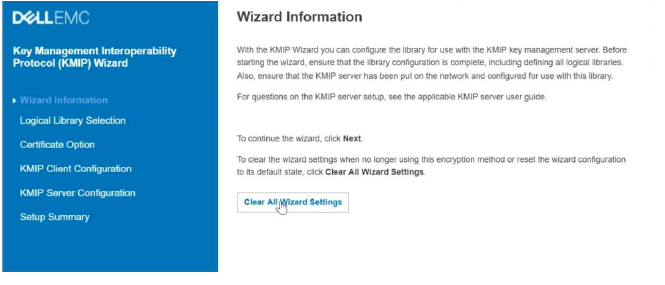
Click Actions dropdown and select Manage Encryption to access the Wizard:
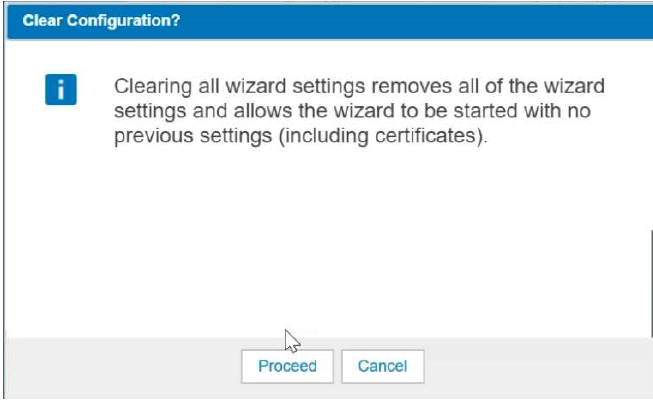
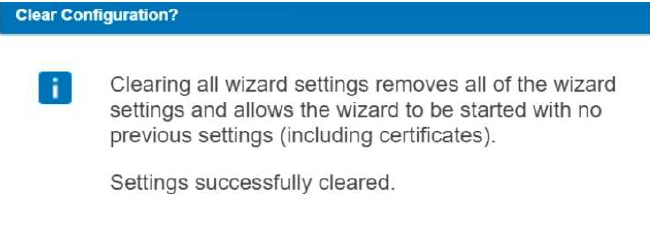
Click Clear All Wizard Settings:
Click Proceed:
Click Next.
On single partition library, the dropdown will show Logical Library Default. On multi partition library, the dropdown will have a list of library partitions.

Click Next.
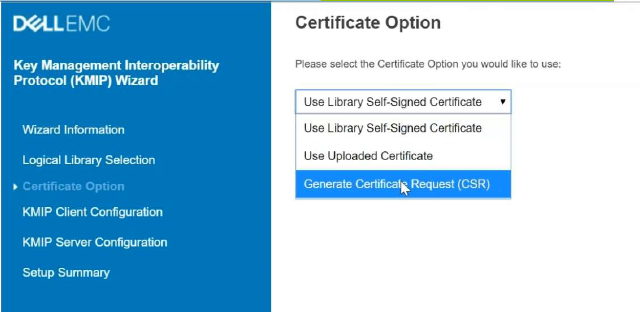
In the Certificate Option, in dropdown, select Generate Certificate Request (CSR).
Click Next.
Note
Now, you can either create dedicated credentials per Library or a common one for all Libraries.
Click Next.
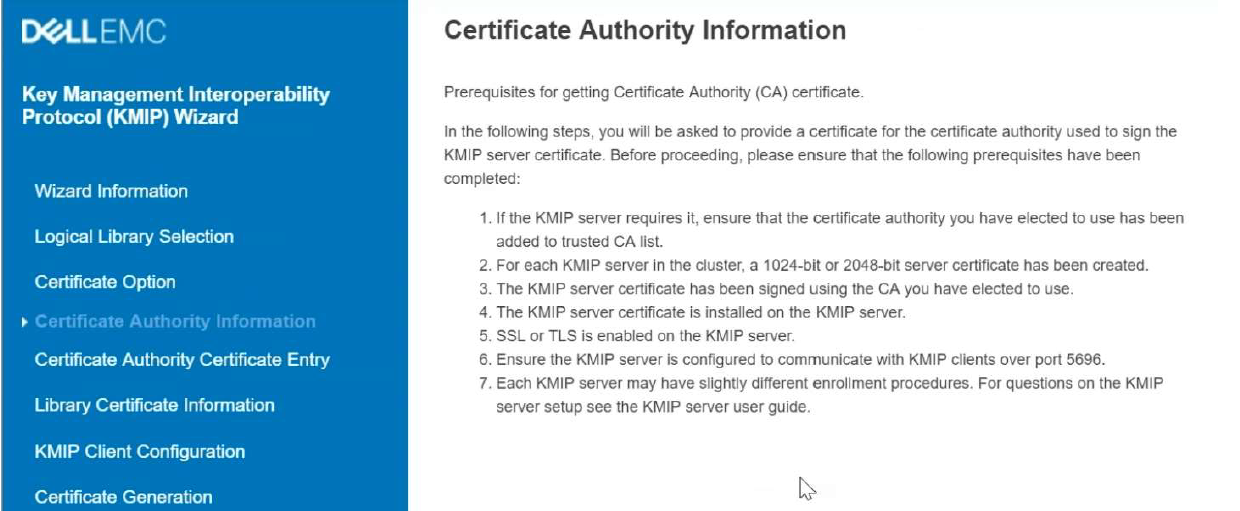
Enter the Certificate Authority(CA) from the CipherTrust Manager:
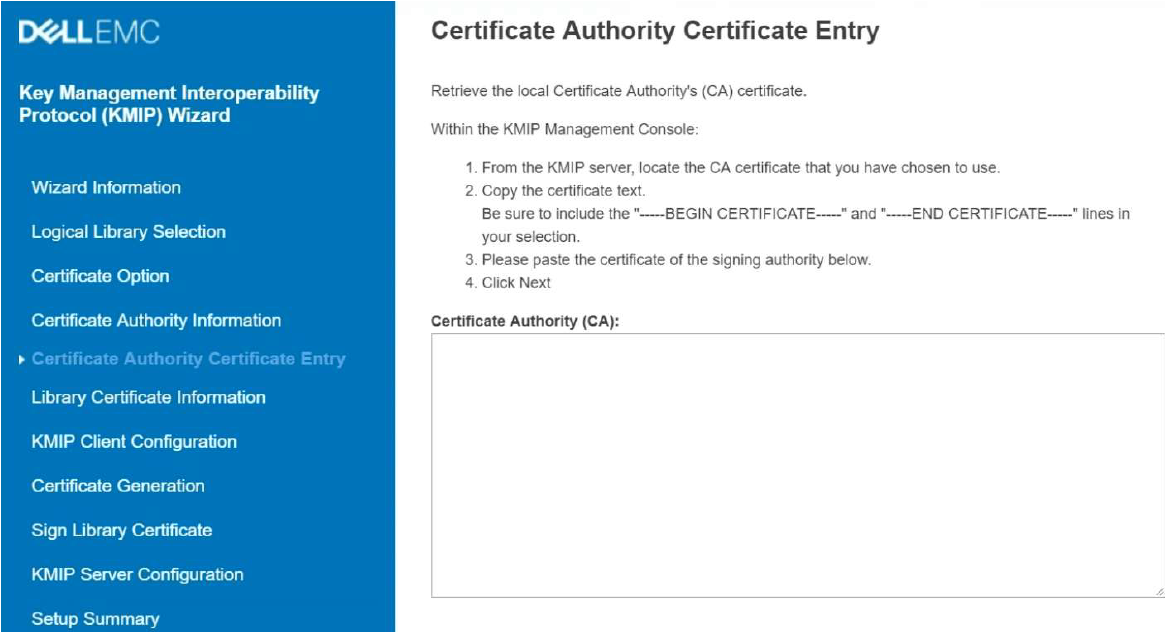
Click Next.
Click Next again.
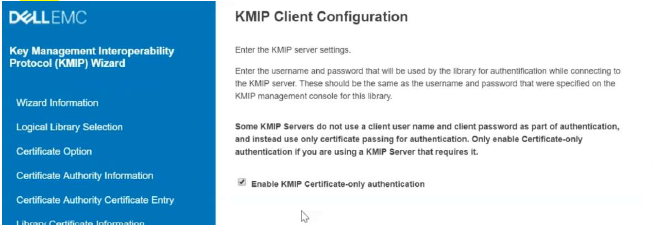
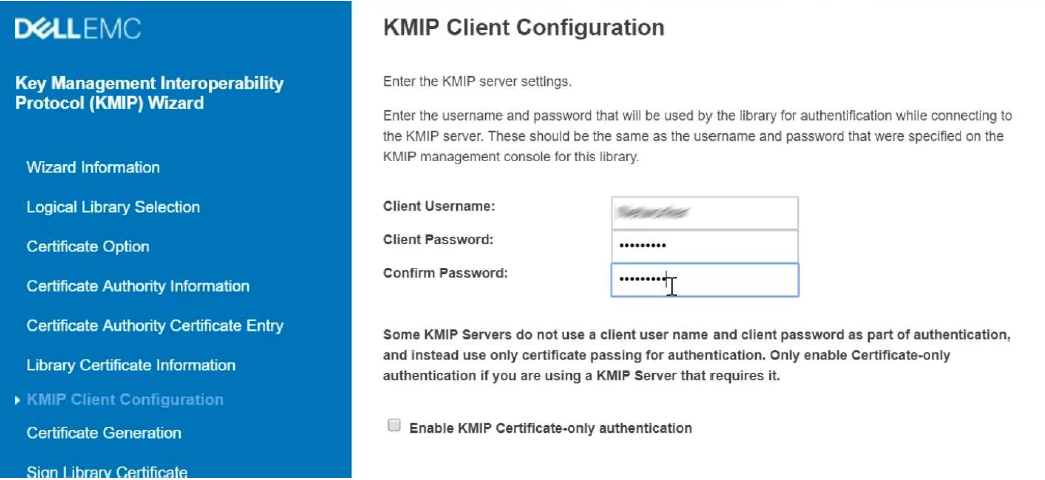
The CipherTrust Manager KMIP server requires the KMIP credentials for Authentication. Clear the Enable KMIP Certificate-only authentication checkbox to enter the username and password of the KMIP user previously created for the specified Library:
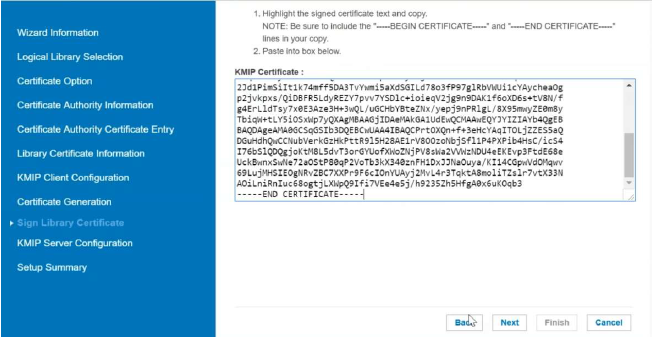
Click Next and copy the Library Certificate.
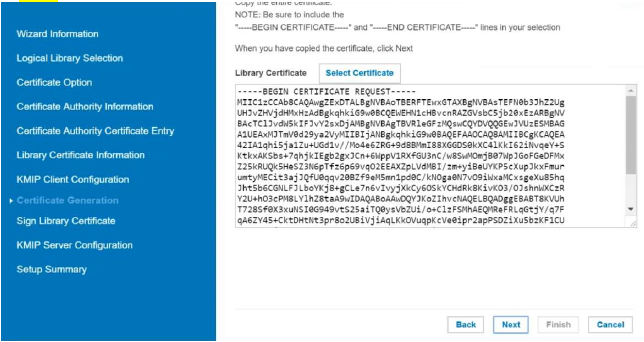
Paste the copied Library Certificate in the KMIP Certificate field.
Click Next. Select KMIP Compatible and enter CipherTrust nodes IP adresses/ Ports. It allows upto 10 key managers.
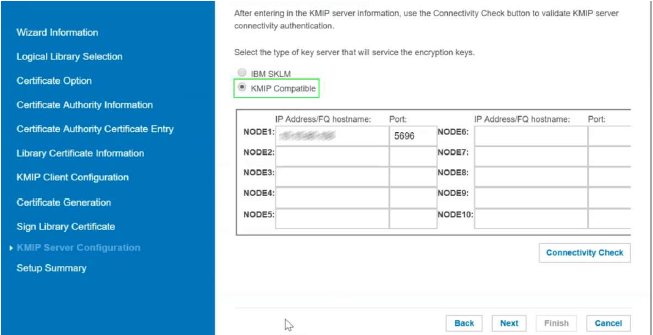
Click on 'Connectivity Check' to test the communication. The result should be successful :
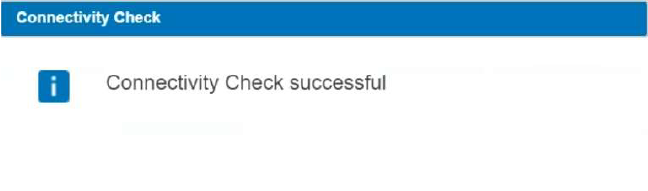
Click Next.
Review the summary and click Finish.
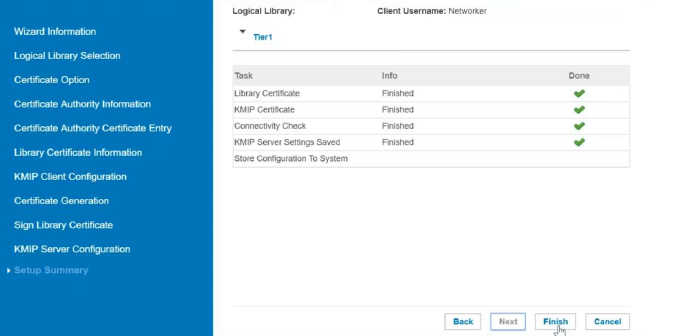
Click Exit.
Note
Only one license per library even for multiple partitions (each partition uses same source IP)