Integration of Dell EMC ECS
This section lists the steps to integrate Dell ECS with CipherTrust Manager.
Prerequisites
This section provides the prerequisites for integration of Dell ECS with CipherTrust Manager.
At least two CipherTrust Managers are installed and operational. This is an ECS requirement for redundancy.
ECS is installed and ready for external key manager configuration.
Port 5696 is open between CM and ECS.
A local machine with OpenSSL is available.
The integration steps in this section assume the following default KMIP interface configuration on CM. These steps can be adjusted for other configurations:
The Interface Mode is set to TLS, verify client cert, user name from client cert, and auth request is optional.
Auto Registration is not disabled.
A Local CA signed the KMIP interface certificate and will also be used to sign the client certificate.
The same Local CA is trusted on the KMIP interface.
Consideration
Loading the KMIP Server Certificate in ECS
ECS requires loading the KMIP interface server certificate instead of the Root CA certificate. As a result, when the server certificate is replaced or renewed on the KMIP interface, it must also be replaced in ECS.
Configuration on CipherTrust Manager
To configure the CipherTrust Manager, you need to perform the following steps:
Create a User
Create a user on CipherTrust Manager to authenticate ECS. The Username must match the Common Name in the user certificate. The ECS endpoint Username/Common Name is visible in the Owner field for any endpoint keys.
On the left menu, navigate to Access Management > Users and click Add User to create a user for ECS.
On the Add User form, enter the following required information:
A Username for ECS. Make this as specific as necessary to uniquely identify the ECS endpoint system-wide.
A Password. The password will not be used in this integration, but must be entered to create the user.
Uncheck the Allow user to login using CipherTrust web app and Allow user to login using password check boxes.
All other settings can be default.
Click the Add User button.
From the Users list, click the username you just created.
Click the GROUP MEMBERSHIPS option.
Click the Add Group button.
In the Search box, enter the word "key". Matching groups will automatically appear.
Check the Key Users box and then click Add Group.
The ECS user is now configured.
Create a Registered Client Certificate
To create a Registered Client Certificate for Dell ECS:
Create a Client Profile, which includes entering the Distinguished Name for the internally generated CSR and selecting the Local CA to sign the certificate.
Create a Registration Token to associate with the client certificate.
Create the Registered Client and download the signed certificate and private key for ECS installation.
All of these configuration steps can be performed on the KMIP page. Navigate to KMIP tile on the Products page of CM.
Create a Client Profile
To create a Client Profile, perform the following steps:
Click Client Profile in the left menu of the KMIP page and then Add Profile.
Enter a Profile Name that identifies the ECS endpoint for which the certificate will be generated and expand the Certificate Details section. Note the profile name for future step, if required.
In the Certificate Details section on the right, enter the Distinguished Name for the certificate. The Common Name field must be the same as the username that was used to create the User on CM for ECS earlier.
Click Save.
Note
In case you encounter the error 'Invalid user in KMIP profile' after clicking Save button, it means the Common Name does not match the username from the Create a User section.
Create a Registration Token
A Registration Token needs to be generated for all client certificates. The client certificates will be generated using the Client Profile that you just created. When creating the token, you can specify the lifetime of the token and how many client certificates can be created using the token.
With the profile created, click the Registration Token option in the left menu on the KMIP page, and then click the New Registration Token button.
Enter the Name Prefix. For example, ECS and click Next.
Select the Local CA trusted on the KMIP Interface to be used and click Next.
Select the Client Profile for ECS created on the previous step and click Next.
Click Copy to copy the registration token displayed.
Create a Registered Client
A registered client certificate can be created using the Client Profile created for ECS and the Registration Token.
Click Registered Clients in the left menu on the KMIP page and click Add Client.
Enter Registered Client name for this ECS endpoint. It does not need to match the Profile Name for the Client Profile.
Paste the copied Registration Token and click Save. The token is bound to the Client Profile, it provides the Distinguished Name information for the certificate.
Click Save Certificate and Save Private Key to download these files.
Rename the downloaded certificate and private key file to something meaningful to avoid confusion, and if necessary, transfer the files to the machine with OpenSSL.
Note
The private key is a critical security parameter. Treat it per security policy.
Use OpenSSL to Prepare for ECS Configuration
Configuring ECS requires that the certificate and private key be loaded via a PKCS #12 file. OpenSSL can be used to create this, as well as pull down and decode the need KMIP server certificate from CM.
Create the PKCS #12 Identity Store File
On the machine with OpenSSL, navigate to the directory where the certificate and private key file are located, and enter the following command to generate a PKCS #12 file, which ECS refers to as an Identity Store file. OpenSSL will prompt for a password to protect the file. Remember or store the password safely.
openssl pkcs12 -export -in <client cert filename> -inkey <private key filname> -out <p12 filename>.p12
If necessary, transfer the Identity Store PKCS#12 file to the local machine from which ECS will be configured.
Download the Server Certificate
Information needed from the KMIP interface server certificate, and the server certificate to enter into ECS. Below is an example of using OpenSSL to extract this information.
Use the following OpenSSL command to retrieve the server certificate from the KMIP interface on CM:
openssl s_client -connect <CM FQDN or IP address>:<kmip port>
Look for the Certificate Chain section, and make note of the Common Name in the server certificate, as shown below. On the ECS user interface, enter this in the Server Host Name field.
Copy the PEM-encoded KMIP interface server certificate, as shown in the highlighted box below, and save it to a file. Be careful to include all leading and trailing dashes.
If necessary, transfer the server certificate file to the local machine from which ECS will be configured. Copy or note the Common Name from the certificate.
Download the CRL File
ECS requires that a CRL file, known as the Revocation Certificate by ECS, is imported at the time of the key manager configuration. Their documentation mentions that this file can be empty. Given its limited value as a static file, it’s not unreasonable to just create and upload an empty text file.
The CRL Distribution Point URI can be found by decoding the KMIP interface server certificate that was just acquired. OpenSSL can be used to conveniently do this or another decoding tool can be used. If it is required to upload the actual file from CM, instructions follow.
Issue the following OpenSSL command to decode the server certificate and expose the CRL URI:
openssl x509 -in <server cert filename> -text -noout
Search for the CRL Distribution Point URI in the output and copy it.

Use a browser to navigate to the URI, which will result in the CRL file being automatically downloaded.
- If necessary, transfer the CRL file to the local machine from which ECS will be configured.
Configuration on Dell EMC ECS
The following files should be available on the local machine for the ECS configuration and the indicated associated information with them:
The PCKS #12 Identity Store file and its password
The KMIP Interface Server Certificate file and the Common Name of the server from the certificate
The CRL file
Perform the following steps to configure external key managers on ECS. Refer to the ECS Administration Guide for additional information.
Navigate to ECS > Settings > Key Management > External Key Manager and click New Cluster.
In the Cluster Name field, type a unique name for the cluster.
In the External Key Management Type field, select Thales CipherTrust from the drop-down menu and Click Save.
Next to Edit, click the drop-down arrow and click Add Server to add CipherTrust KMS Servers to this Cluster.
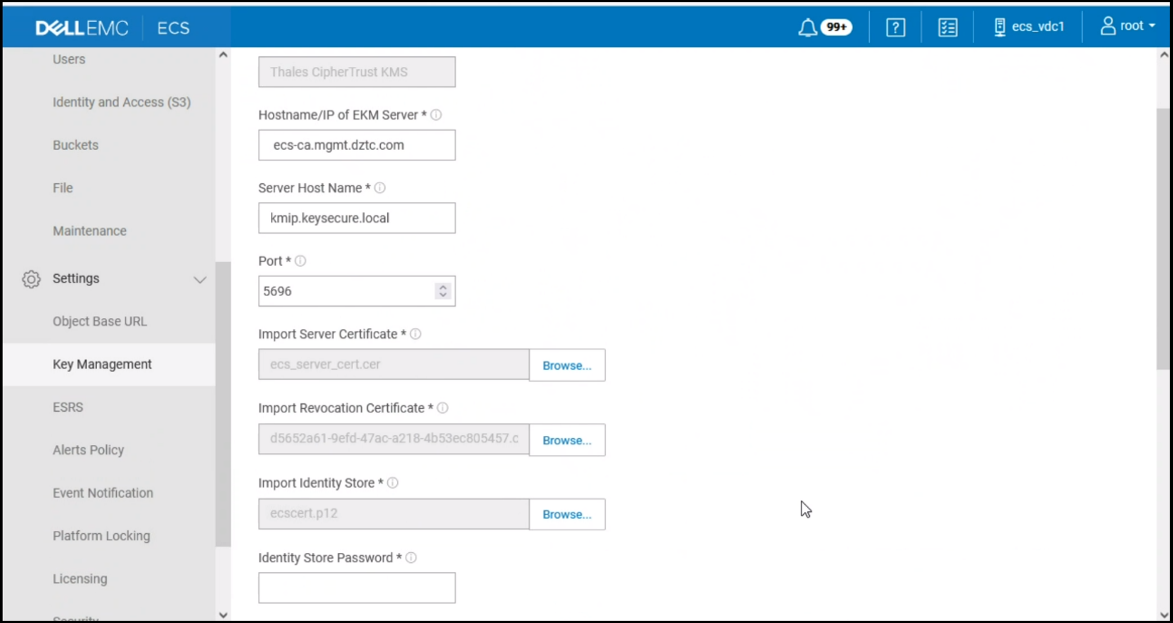
On the New External Key Server form, enter the Hostname or IP address of CipherTrust Manager in the Hostname/IP of EKM Server field.
In the Server Host Name field, enter the Common Name extracted from the KMIP interface server certificate.
Adjust the Port field if the KMIP Interface port on CipherTrust Manager is different from the default of 5696.
Using Import Server Certificate browse control, browse to the location of the KMIP interface server certificate.
Using the Import Revocation Certificate browse control, navigate to the CRL file.
Using the Import Identity Store browse control, navigate to the PCKS #12 Identity Store file.
Click Save.
Repeat steps 4 – 11 on ECS for each CipherTrust KMS Node in your Cluster.
Once you have added all CipherTrust Nodes into the KMS cluster, go to the EKM Server Mapping tab and select each CipherTrust KMS by clicking the arrow next to the entry.
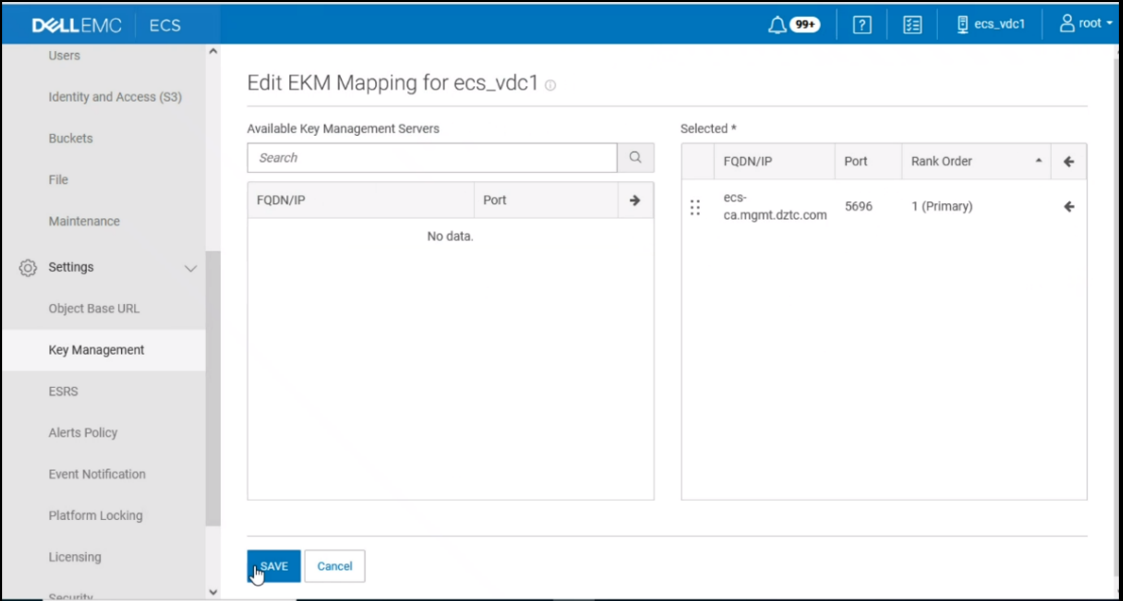
After adding a minimum of two CipherTrust KMS devices, navigate back to Key Management > External Key Manager.
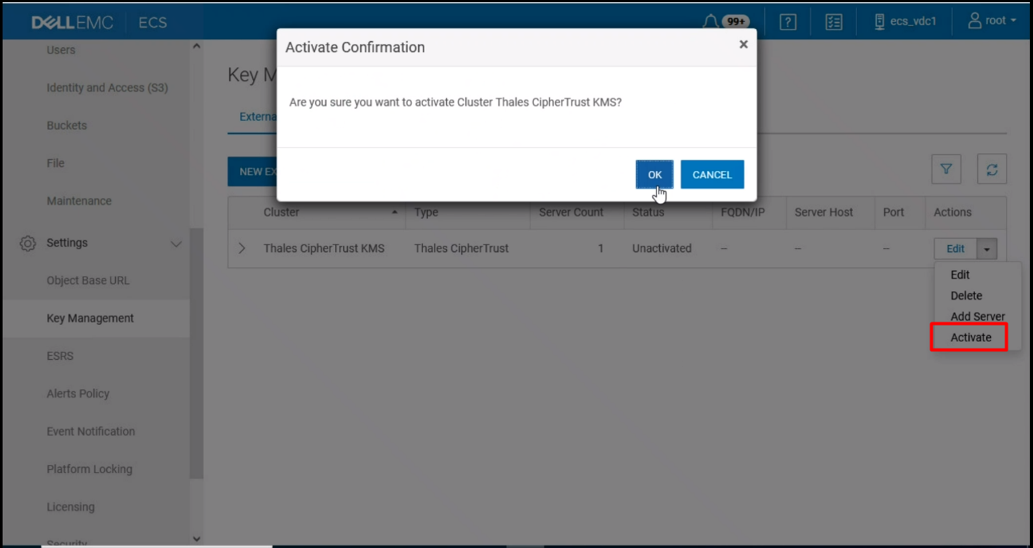
To activate the CipherTrust EKM cluster, click the Actions drop-down arrow, select Activate, and click OK to confirm. This should trigger communication with CipherTrust Manager.